BayZR - утилита позволяющая собирать данные статических анализаторов кода и формировать единый отчет о результате проверки. Отчет может быть предоставлен как в кратком виде для дальнейшей его обработки, так и в расширенном виде - текст с комментариями или html формат.
BayZR прежде чем запустить анализатор кода пытается найти с какими параметрами собирается каждый файл проекта, и после этого в формате, понятном для конкретного анализатора кода, передает собранные параметры по каждому файлу.
Список поддерживаемых анализаторов
На текущий момент утилита поддерживает такие статические анализаторы:
clang-analyzer
The Clang Static Analyzer is a source code analysis tool that finds bugs in C, C++, and Objective-C programs.
Currently it can be run either as a standalone tool or within Xcode. The standalone tool is invoked from the command line, and is intended to be run in tandem with a build of a codebase.
The analyzer is 100% open source and is part of the Clang project. Like the rest of Clang, the analyzer is implemented as a C++ library that can be used by other tools and applications.
cppcheck
Cppcheck is a static analysis tool for C/C++ code. Unlike C/C++ compilers and many other analysis tools it does not detect syntax errors in the code. Cppcheck primarily detects the types of bugs that the compilers normally do not detect. The goal is to detect only real errors in the code (i.e. have zero false positives).
oclint
OCLint is a static code analysis tool for improving quality and reducing defects by inspecting C, C++ and Objective-C code and looking for potential problems like:
- Possible bugs - empty if/else/try/catch/finally statements
- Unused code - unused local variables and parameters
- Complicated code - high cyclomatic complexity, NPath complexity and high NCSS
- Redundant code - redundant if statement and useless parentheses
- Code smells - long method and long parameter list
- Bad practices - inverted logic and parameter reassignment
- ...
rats
The Rough Auditing Tool for Security is an open source tool developed by Secure Software Engineers. Since then it has been acquired by Fortify, which continues to distribute it free of charge. It scans various languages, including C, C++, Perl, PHP and Python. It is very fast and can easily be integrated into a building process without causing noticeable overhead.
splint
Splint is a tool for statically checking C programs for security vulnerabilities and coding mistakes. With minimal effort, Splint can be used as a better lint. If additional effort is invested adding annotations to programs, Splint can perform stronger checking than can be done by any standard lint.
frama-c
Frama-C is a suite of tools dedicated to the analysis of the source code of software written in C. Frama-C gathers several static analysis techniques in a single collaborative framework. The collaborative approach of Frama-C allows static analyzers to build upon the results already computed by other analyzers in the framework. Thanks to this approach, Frama-C provides sophisticated tools, such as a slicer and dependency analysis.
pylint
Pylint is a source code, bug and quality checker for the Python programming language. It follows the style recommended by PEP 8, the Python style guide.[4] It is similar to Pychecker and Pyflakes, but includes the following features:
- Checking the length of each line
- Checking if variable names are well-formed according to the project's coding standard
- Checking if declared interfaces are truly implemented
rpmlint
rpmlint is a tool for checking common errors in rpm packages. It can be used to test individual packages and spec files before uploading or to check an entire distribution. By default all applicable checks are processed but specific checks can be performed by using command line parameters.
shellcheck
ShellCheck is a GPLv3 tool that gives warnings and suggestions for bash/sh shell scripts
Конфигурационные файлы
Анализатор поддерживает такие конфигурационные файлы:
- bzr.conf
- bzr.d/*.conf
- bzr.d/*.tpl
bzr.conf
Это конфигурационный файл самой программы. Типовой пример с объяснениями:
[default]
compilator = gcc c++ cc <-какую строку в make выводе считать, что это вызов компилятора
extention=c cpp h cxx hpp c++ <-какие файлы из вывода make включать в анализ(расширение файла с точкой или без)
stderr=on <- выводить лог ошибок make
globaldefs= -Ddef1 -Ipath <- глобальные специфические параметры добавляемые всем файлам проектов или проекта
outputfile=report.log <-сюда сохраняется результат проверки
replace=on <-включить анализ параметров передаваемых компилятору путем замены gcc или просто читать вывод утилиты
bashcmd=bash -c <-команда для запуска компиллятора(зачастую использует значения по умолчанию и не требует смены). Меняется в случае если bash или shell оболочка находятся не по стандартному пути PATH
[extended]
;filename = -Ddef1 -Ddef2 <-специфические для файла параметры, добавляемые в DEF список или INCLUDE список
[plugins]
checkby=cppcheck rats clang <- список плагинов, которые необходимо применить к анализируемым файлам
output=html или txt или custom <-формат вывода результата
template=FILE|LINE|SEV|ID|MESSAGE <-шаблон вывода для custom формата
wrapstrings=20 <-20 строк до строки с ошибкой и 20 после, только для html и txt отчета
html_template=result_w3.tpl <-файл шаблон оформления результата(для html отчета)
[ignore]
filename1
filename2
список файлов которые нужно игнорировать и не проверять
Содержимое файла по-умолчанию
[default]
compilator = gcc c++ cc cc1
extention= c cpp h cxx hpp c++
stderr=on
globaldefs= -Dlinux
outputfile=report.html
replace=off
bashcmd=/bin/bash -c

[plugins]
checkby=cppcheck
output=html
template=FILE;LINE;SEV;ID;MESSAGE
wrapstrings=20
html_template=result_w3.tpl
bzr.d/*.conf
Конфигурационные файлы для запуска анализатора. Для каждого анализатора(плагина) свой файл
Результатом работы плагина должна быть секция CMD, которая бы запустила анализатор файла исходных кодов, а также секция RESULT, которая описывает как разбирать результат анализа.
Служебные секции:
каждая секция состоит из имени и содержимого [имя]{содержимое}. Содержимое может быть однострочным и многострочным, скобочки содержимого могут быть такого вида:
    1) NAME{descr}
    2) NAME{
    descr}
    3) NAME{
    descr
    }
    4) NAME
    {
    descr
    }
    5) NAME
    {descr}
    ...
Значения секций:
NAME - имя плагина отображаемого при выводе команды help или list(сводится в одну строку)
DESCRIPTION - описание плагина(сводится в одну строку)
ID - идентификатор [a-zA-Z] для использования при конфигурировании(1 строка, остальные не анализируются)
TYPE - тип плагина и анализируемых параметров: 1 - cppcheck подобный вывод, 2 - rats подобный вывод(т.е без шаблона и описание идет одной строкой после вывода ошибки)
OPTIONS - список параметров передаваемых анализатру, параметры разделяются концом строки. Могут содержать переменные, которые начинаются с $, если переменная не описана в конфигурационном файле и анализатор не знает как ее вычислить, то параметр удаляется из списка OPTIONS
LANG - список расширений файлов и соответствия какой язык с или с++, для анализаторов, которые требуют такого анализа
RESULT - список параметров, которые будут разбираться в выходном файле и \ разделитель DELIMIT=, каждый параметр через запятую или с новой строки.\ уровни HIGH,MEDIUM,LOW=с перечислением какие идентификаторы ошибки к чему причислять\ и STREAM= откуда читать сведения о результате из stderr или stdout\
CMD - команда для запуска анализатора
DEFS - шаблон, как формировать список опеределений, можно указывать \(:,\):, \(: и т.д. Это значит что вмеcто первого\): подставится первый параметр, вместо второго - второй и т.д
FILENAME - шаблон, как передавать имя файла, задается как $FILE
INCLUDES - шаблон, как формировать список includes, можно указывать \(:,\):, $: и т.д
Переменные:
Переменные делятся на Подстановочные и Кастомные и Генерируемые.
Постановочные:
переменные которые формирует сам анализатор:
STD, ARCH, PLAT - если анализатор не смог сам опреедлить, то берется то, что задано в конфигурационном файле
Генерируемые:
NAME, DESCRIPTION, ID, TYPE, OPTIONS, LANG, RESULT, CMD, DEFS, FILENAME, INCLUDES - эти переменные всегда определяются анализатором на основе заданных секций или если не заданы, то равны пустой строке
Кастомные:
переменные которые полностью определяются конфигурационным файлом
Вид переменной может задаваться как:
    _[имя переменной]{
    [значение по умолчанию]
    DEF=[операций командной строки]
    CMD=[операция командной строки]
    }
здесь: DEF - команда, которая формирует значение по умолчанию \ CMD - команда для получения значения переменной \ значение по умолчанию - если не определено DEF и CMD и не требуется запуск стороннего приложения
Пример файлов анализаторов
cppcheck.conf
NAME{cppcheck}
DESCRIPTION{
Cppcheck is a static analysis tool for C/C++ code. Unlike C/C++ compilers and many other
analysis tools it does not detect syntax errors in the code. Cppcheck primarily detects
the types of bugs that the compilers normally do not detect. The goal is to detect only
real errors in the code (i.e. have zero false positives).
}
ID{cppcheck}
TYPE{1}
_STD{c99}
ARCH{
32=__i386__
64=__x86_64__
DEFAULT=__x86_64__
}
PLAT{
linux32=unix32
linux64=unix64
DEFAULT=unix64
}
OPTIONS{
--std=$STD
--template="{file}|{line}|{severity}|{id}|{message}"
-D$ARCH
--language=$LANG
--platform=$PLAT
--enable=warning,style,performance,unusedFunction
--suppress=preprocessorErrorDirective
--suppress=toomanyconfigs
--suppress=variableScope
--suppress=variableHidingTypedef
--suppress=unusedFunction
--inconclusive
}
LANG{
C=c cc h
C++=cpp c++ cxx hpp
DEFAULT=C
}
RESULT{
:FILE
:LINE
:SEV
:ID
:MESSAGE
DELIMIT=|
STREAM=stderr
LOW=none,style,information,portability
MEDIUM=warning,performance
HIGH=error,preprocessorerrordirective
}
DEFS{-D$:}
INCLUDES{-I$:}
FILENAME{$FILE}
AUTOINCLUDE{
--include=
}
CMD{
/usr/bin/cppcheck $OPTIONS $DEFS $CUSTOMDEFS $FILENAME
}
rats.conf
NAME{rats}
DESCRIPTION{
The Rough Auditing Tool for Security is an open source tool developed by Secure
Software Engineers. Since then it has been acquired by Fortify, which continues to
distribute it free of charge. It scans various languages,
including C, C++, Perl, PHP and Python.
}
ID{rats}
TYPE{2}
OPTIONS{
-r
--resultsonly
-w1
}
RESULT{
:FILE
:LINE
:SEV
:MESSAGE
DELIMIT=:
STREAM=stdout
LOW=low
MEDIUM=medium
HIGH=high
}
FILENAME{$FILE}
AUTOINCLUDE{
-I
}
CMD{
/usr/bin/rats $OPTIONS $FILENAME
}
clang-analyzer.conf
NAME{clang-analyzer}
DESCRIPTION{
scan-build is a command line utility that enables a user to run the static analyzer over their codebase as part of performing a regular build (from the command line).
}
ID{clang-analyzer}
TYPE{1}
OPTIONS{
-o .
-enable-checker alpha.core.FixedAddr
-enable-checker alpha.core.IdenticalExpr
-enable-checker alpha.core.PointerArithm
-enable-checker alpha.core.PointerSub
-enable-checker alpha.core.SizeofPtr
-enable-checker alpha.cplusplus.NewDeleteLeaks
-enable-checker alpha.deadcode.IdempotentOperations
-enable-checker alpha.deadcode.UnreachableCode
-enable-checker alpha.security.ArrayBoundV2
-enable-checker alpha.security.ReturnPtrRange
-enable-checker alpha.security.MallocOverflow
-enable-checker alpha.unix.MallocWithAnnotations
-enable-checker alpha.unix.PthreadLock
-enable-checker alpha.unix.Stream
-enable-checker alpha.unix.cstring.BufferOverlap
-enable-checker alpha.unix.cstring.NotNullTerminated
-enable-checker alpha.unix.cstring.OutOfBounds
-enable-checker security.insecureAPI.strcpy
}
RESULT{
:FILE
:LINE
:ID
:SEV
:MESSAGE
DELIMIT=:
STREAM=stderr
LOW=information
MEDIUM=warning
HIGH=error
CLEAN=scan-build: Run 'scan-view [\S\s]*/([0-9\-]+)'
}
DEFS{-D$:}
INCLUDES{-I$:}
FILENAME{$FILE}
AUTOINCLUDE{
-I
}
CMD{
/usr/bin/scan-build $OPTIONS $FRESH
}
BEFORECMD{
make clean
}
FRESH{
1
}
bzr.d/*.tpl
Шаблоны вывода для html. Оформление вывода для формирования удобочитаемого результата. Синтаксис формирования файла строится по правилам: https://golang.org/pkg/html/template/
Шаблон может отобразить такие структуры:
type reporter.ReporterContainerLineItemLink struct {
    Number int64
    Line   string
    FndStr bool
}

type reporter.ReporterContainerLineItem struct {
    Number int64
    Line   string
    Value  int
    Plugin string
    Link   []reporter.ReporterContainerLineItemLink
}

type ListOfErrorsShort struct {
    Position      int64
    Error_message string
}

type ListOfErrorLong struct {
    Critical int64
    Warning  int64
    Normal   int64
    List     []reporter.ReporterContainerLineItem
}

type PreparedToOutput struct {
    ReportName     string
    ListOfCheckers map[string]int64
    ListOfShort    map[string][]ListOfErrorsShort
    ListOfLong     map[string]ListOfErrorLong
    ListOfFiles    []string
    Consts         []int
}
Параметры командной строки
    $ bayzr --help
    Usage of bayzr:
        bayzr [options] cmd ...
      -cc
            Run as C compiler wrapper
      -config string
            path to configuration file (default "/etc/bzr.conf")
      -cxx
            Run as C++ compiler wrapper
      -debug-commands
            Show list of generated static analizers options and commands
      -diff string
            List of patch file for get list of patched files
      -dry-run
            Show list of generated static analizers options and commands without analitic tool starting
      -files string
            List of files should be inserted to report or * for all files(by dafault) (default "*")
      -list
            Show list of available plugins
      -menu
            Show console menu for project options configuring
      -not-only-local
            Show in result errors not only for project files
      -version
Print the version number.-ccи-cxx- являются командами для служебного пользования. Используется самим анализатором, при настройках ''replace=on''.-config- позволяет указать не стандартный путь к файлу конфигурации bzr.conf-diff- список патч файлов для отображения лишь тех строк и файлов в отчете, которые затрагивают патчи. Удобно использовать команду в случае, когда не нужен отчет по всему исходному коду, а лишь по изменившейся части-files- аналогично ''-diff'', но задается список файлов через запятую, в отчет попадают лишь ошибки из этих файлов-list- вывести список доступных/известных анализаторов кода-not-only-local- отобразить в отчете ошибки и замечания файлов не входящих в анализируемый проект(например ошибки и замечания в заголовочных файлов сторонних пакетов и программ, используемых в проекте)-dry-run- запустить анализ вывода сборки и вывести команды для запуска анализаторов без запуска самих анализаторов. Будет полезна при уникальном вызове анализатора, когда нужно знать все сопутствующие параметры окружения сборки файла, но нужно добавить что-то самостоятельное-menu- интерактивный диалог по локальной настройке параметров проекта на базе curses(ncurses)
Установка BayZR на CentOS 6 и CentOS 7
Последовательность установки CentOS 7
wget http://download.opensuse.org/repositories/home:/bayrepo/CentOS_7/home:bayrepo.repo -O /etc/yum.repos.d/home:bayrepo.repo
yum install bayzr -y
установка завершена
Установка BayZR не из пакета
Команды необходимо выполнять от пользователя root, на сервере должны быть установлены golang и git
Последовательность сборки
git clone git@github.com:bayrepo/bayzr.git
cd bayzr/rpm
sh build_from_source.sh
установка и сборка завершены
Пример 1 (mod_performance версия 0.4)
Исходные коды модуля доступны по адресу https://github.com/bayrepo/mod_performance
Вариант 1 - проверка на основе данных компиляции кода
Последовательность действий проверки:
скачиваем архив с исходным кодом
wget https://github.com/bayrepo/mod_performance/archive/master.zip
распаковываем и переходим в папку с исходными кодами
unzip master.zipcd mod_performance-master/
копируем глобальный файл настроек и делаем его специфическим для текущей папки, добавляем проверку rats и имя результирующего отчета, а также число обрамляющих ошибку строк
cp /etc/bzr.conf ./bzr.confvi bzr.conf
    [default]
    compilator = gcc c++ cc cc1
    extention= c cpp h cxx hpp c++
    stderr=on
    globaldefs= -Dlinux
    outputfile=mod_perf_report_0.4.18.html
    replace=off
    bashcmd=/bin/bash -c

    [plugins]
    checkby=cppcheck rats
    output=html
    template=FILE;LINE;SEV;ID;MESSAGE
    wrapstrings=5
    html_template=result_w3.tpl
запускаем анализатор
bayzr cmd make
Вариант 2 - на основе списка файлов
Последовательность действий проверки:
скачиваем архив с исходным кодом
wget https://github.com/bayrepo/mod_performance/archive/master.zip
распаковываем и переходим в папку с исходными кодами
unzip master.zipcd mod_performance-master/
копируем глобальный файл настроек и делаем его специфическим для текущей папки, добавляем проверку rats и имя результирующего отчета, а также число обрамляющих ошибку строк
cp /etc/bzr.conf ./bzr.confvi bzr.conf
    [default]
    compilator = gcc c++ cc cc1
    extention= c cpp h cxx hpp c++
    stderr=on
    globaldefs= -D__FREEBSD__ -I/usr/include/httpd/ -I/usr/include/apr-1
    outputfile=mod_perf_report_0.4.18_2.html
    replace=off
    bashcmd=/bin/bash -c

    [plugins]
    checkby=cppcheck rats
    output=html
    template=FILE;LINE;SEV;ID;MESSAGE
    wrapstrings=20
    html_template=result_w3.tpl
запускаем анализатор
bayzr cmd "find . -name '*.c' | xargs -n 1 echo 'gcc '"- т.е искусственно создается gcc и путь к файлу
Пример 2 (искусственный код)
Вот такой код был подготовлен для статического анализа:
Искусственный код - пример: buggy_test.c
#include <stdio.h>

#include <strings.h>
#include <stdlib.h>

#include <string.h>

int function1(char *a){
    printf("Variable 1 = %d\n", strlen(a));
    a = malloc(10*sizeof(char));
    sprintf(a, "This is huge text, more then array size %d\n", 10000000000L);
    return strlen(a);
}

char *function2(){
    char *internal_buffer = alloca(10 * sizeof(char));
    snprintf(internal_buffer, 12, "Another big string to copy to the buffer\n");
    return internal_buffer;
}

int function3(int a, int b){
    int c[20];
    int i;
    a = a * i;
    for (i=0;i<21;i++){
     c[i]=a*b;
     a=++a+a++;
    }
    return c[i-22];
}

int main(int argc, char **argv){
    char arr[10] = "12345678901";
    char *buf;
    if (argc>0){
    strcpy(arr, argv[1]);
    }
    int result = function1(buf);
    printf("Result %d, %s\n", result, arr);
    buf = function2();
    printf("Buf %s\n", buf);
    result = function3(10,20);
    printf("Result %d\n", result);
    return 0;
}
Результат
- зайти в папку сканируемого проекта
cd ~/check/в папке находится тестируемый файл - с помощью команды
-menuсоздаются локальные настройки для проекта - далее дается команда
-debug-commands cmd gcc -o buggy test.cдля сборки проекта, в момент сборки bayzr собирает список файлов для анализа и список параметров сборки - результат сборки и работы bayzr - это файл отчета
Описание способов анализа кода с помощью утилиты bayzr
bayzr получает информацию о проверяемых файлах на основе вывода команды сборки проекта или компиляции файла(ов). bayzr анализирует вывод, формирует список файлов и список макроопределений и путей подключения заголовочных файлов. Все эти собранные определения и список файлов передаются анализатору.
Анализаторы бывают нескольких типов:
- самостоятельно собирающие данные о компилируемых файлах: clang-analyzer, make [группа 1]
- несамостоятельные анализаторы. т.е те, которым необходимо передать список определений для более точного анализа проекта, но допускающие отсутствие таких параметров: cppcheck, rats [группа 2]
- несамостоятельные анализаторы. т.е те, которым необходимо передать список определений для более точного анализа проекта и строго требующие параметры для анализа:splint, oclint [группа 3]
- анализаторы с графическим интерфейсом, которые позволяют провести дальнейший анализ кода: frama-c [группа 4]
А теперь рассмотрим способы анализа проектов bayzr утилитой.
Анализ файлов без компиляции
Способ подходит для анализаторов [группы 2], но в этом случае, параметры для более точного анализа файлов необходимо формировать самостоятельно:
Пример команды для нахождения всех файлов с расширением c. К каждому найденному файлу добавляется строка с gcc, таким образом можно сформировать необходимые -D и -I:
bayzr cmd "find . -name '*.c' | xargs -n 1 echo 'gcc '"
[test@localhost check]$ bayzr cmd "find . -name '*.c' | xargs -n 1 echo 'gcc '"; cat report_buggy_c.txt
--------------------Process of gathering source information is begun-----------------
gcc  ./test.c
--------------------Process of source analyzing is begun-----------------------------
--------------------Process of source analyzing is begun by plugin cppcheck----------------
Analyzer error: stderr scanner error read |0: bad file descriptor
Checking /home/test/check/test.c...
/home/test/check/test.c|9|warning|invalidPrintfArgType_sint|%d in format string (no. 1) requires 'int' but the argument type is 'signed long'.
/home/test/check/test.c|25|error|unknownEvaluationOrder|Expression '++a+a++' depends on order of evaluation of side effects
/home/test/check/test.c|24|error|arrayIndexOutOfBounds|Array 'c[20]' accessed at index 20, which is out of bounds.
/home/test/check/test.c|27|error|negativeIndex|Array index -1 is out of bounds.
/home/test/check/test.c|15|error|bufferAccessOutOfBounds|Buffer is accessed out of bounds.
/home/test/check/test.c|14|warning|allocaCalled|Obsolete function 'alloca' called. In C99 and later it is recommended to use a variable length array instead.
/home/test/check/test.c|10|error|memleak|Memory leak: a
/home/test/check/test.c|22|error|uninitvar|Uninitialized variable: i
/home/test/check/test.c|36|error|uninitvar|Uninitialized variable: buf
/home/test/check/test.c

         4|  #include `<string.h>`
         5|
         6|  int function1(char *a){
         7|      printf("Variable 1 = %d\n", strlen(a));
         8|      a = malloc(10*sizeof(char));
//**DETECT** cppcheck:      %d in format string (no. 1) requires 'int' but the argument type is 'signed long'.
         9|      sprintf(a, "This is huge text, more then array size %d\n", 10000000000L);
//**DETECT** cppcheck:      Memory leak: a
        10|      return strlen(a);
        11|  }
        12|
        13|  char *function2(){
//**DETECT** cppcheck:      Obsolete function 'alloca' called. In C99 and later it is recommended to use a variable length array instead.
        14|      char *internal_buffer = alloca(10 * sizeof(char));
//**DETECT** cppcheck:      Buffer is accessed out of bounds.
        15|      snprintf(internal_buffer, 12, "Another big string to copy to the buffer\n");
        16|      return internal_buffer;
        17|  }
        18|
        19|  int function3(int a, int b){
        20|      int c[20];
        21|      int i;
//**DETECT** cppcheck:      Uninitialized variable: i
        22|      a = a * i;
        23|      for (i=0;i<21;i++){
//**DETECT** cppcheck:      Array 'c[20]' accessed at index 20, which is out of bounds.
        24|       c[i]=a*b;
//**DETECT** cppcheck:      Expression '++a+a++' depends on order of evaluation of side effects
        25|       a=++a+a++;
        26|      }
//**DETECT** cppcheck:      Array index -1 is out of bounds.
        27|      return c[i-22];
        28|  }
        29|
        30|  int main(int argc, char **argv){
        31|      char arr[10] = "12345678901";
        32|      char *buf;
        33|      if (argc>0){
        34|      strcpy(arr, argv[1]);
        35|      }
//**DETECT** cppcheck:      Uninitialized variable: buf
        36|      int result = function1(buf);
        37|      printf("Result %d, %s\n", result, arr);
        38|      buf = function2();
        39|      printf("Buf %s\n", buf);
        40|      result = function3(10,20);
        41|      printf("Result %d\n", result);
.......
Таким образом можно список файлов для анализа и параметры сборки собрать в отдельный файл и сделать cat check_files.txt
Анализ с компиляцией
Способ подходит для всех типов анализаторов [группы от 1 до 4]
типичный пример использования:
[#]$ ./configure
[#]$ bayzr cmd make VERBOSE=1
В текущем примере используется VERBOSE=1 для раскрытия утилитой make процесса сборки, хоя возможно обойтись и без этого, а с помощью настройки: replace = on в локальном или глобальном bzr.conf. В этом случае переменные окружения CC и CXX будут подменены на bayzr и параметры компиляции будут перехвачены даже при отключенном выводе процесса сборки.
Анализ с компиляцией и выводом команд анализатора
Режим подобен предыдущему, но в отчет попадают команды, которые были сформированы для вызова анализатора статического кода. Такой режим полезен в случае, когда возможностей bayzr не хватает и нужны дополнительные настройки. Например для анализатора [группы 4], frama-c имеет графический анализатор, позволяющий провести дополнительный анализ исходных файлов.
Команды сформированные bayzr можно напрямую вызвать из командной строки с frama-c-gui например.
[test@localhost check]$ bayzr -debug-commands --dry-run cmd gcc -o buggy test.c
--------------------Process of gathering source information is begun-----------------
test.c: In function ‘main’:
test.c:31:20: warning: initializer-string for array of chars is too long [enabled by default]
     char arr[10] = "12345678901";
 |
 |
--------------------Process of source analyzing is begun-----------------------------
--------------------Process of source analyzing is begun by plugin frama-c----------------
/usr/bin/frama-c -no-frama-c-stdlib -cpp-gnu-like -val -va -wp -sparecode -security-slicing -nonterm -cpp-extra-args="   -Dlinux  -IcHeaderFileGeneratedByBzrPrg.h -I/usr/lib/gcc/x86_64-redhat-linux/4.8.5/include -I/usr/local/include -I/usr/include -I. -m64 -mtune=generic"  test.c
[test@localhost check]$ /usr/bin/frama-c-gui -no-frama-c-stdlib -cpp-gnu-like -val -va -wp -sparecode -security-slicing -nonterm -cpp-extra-args="   -Dlinux  -IcHeaderFileGeneratedByBzrPrg.h -I/usr/lib/gcc/x86_64-redhat-linux/4.8.5/include -I/usr/local/include -I/usr/include -I. -m64 -mtune=generic"  test.c
Параметр -dry-run позволяет не запускать анализатор статического кода, а просто выводит сформированные команды для запуска анализатора
Анализ только заданных файлов
Подходит для всех типов анализаторов [группы от 1 до 4], анализ проходят только по тем файлам, которые выбраны для отчета.
[test@localhost mod_performance-master]$ bayzr -files chart.c cmd make
[test@localhost mod_performance-master]$ cat report.txt
/home/test/mod_performance-master/chart.c

       147|        (*x)[k] = 0;
       148|        (*y)[k] = 0;
       149|      }
       150|
       151|      char *bug = malloc(20);
//**DETECT** cppcheck:      Buffer is accessed out of bounds.
       152|      strcpy(bug, "ASDFGHJKLQWERTYUIOPHJKUYTF");
//**DETECT** cppcheck:      Memory leak: bug
       153|      return;
       154|
       155|  }
       156|
       157|  void
       158|  readmatrix(apr_array_header_t *data, double **a, double **b, double **x,
.......
       466|          }
       467|        if (s->date > cur)
       468|          return 0.0;
       469|      }
       470|    char a[5]="FRTDESWERTYUUU";
//**DETECT** cppcheck:      %d in format string (no. 1) requires 'int' but the argument type is 'char *'.
       471|    printf("%d",a);
       472|    return 0.0;
       473|  }
       474|
       475|  apr_array_header_t *
       476|  chart_fill_data(apr_array_header_t *data, int min, int max)
.......
       762|          }
       763|        if (ti.seconds)
       764|          {
       765|            sprintf(buffer, "sec %d", ti.seconds);
       766|            gdImageString(im, fptr, rw - 2 * dx - 10, rh - dup, (unsigned char *)buffer, black);
//**DETECT** cppcheck:      Variable 'dup' is assigned a value that is never used.
       767|            dup -= 10;
       768|          }
       769|      }
       770|    else
       771|      {
       772|        gdImageLine(im, rw - 2 * dx, rh - 40, rw - dx, rh - 40, black);
.......
или вообще, список заданных файлов берется из патч файла:
[test@localhost mod_performance-master]$ cat new-commit.patch
diff --git a/chart.c b/chart.c
index 81470f4..9835b81 100644
--- a/chart.c
+++ b/chart.c
@@ -147,6 +147,10 @@ allocmatrix(apr_pool_t *p, double **a, double **b, double **x, double **y,
       (*x)[k] = 0;
       (*y)[k] = 0;
     }
+
+    char *bug = malloc(20);
+    strcpy(bug, "ASDFGHJKLQWERTYUIOPHJKUYTF");
+    return;

 }

[test@localhost mod_performance-master]$ bayzr -diff new-commit.patch cmd make
[test@localhost mod_performance-master]$ cat report.txt
/home/test/mod_performance-master/chart.c

       147|        (*x)[k] = 0;
       148|        (*y)[k] = 0;
       149|      }
       150|
       151|      char *bug = malloc(20);
//**DETECT** cppcheck:      Buffer is accessed out of bounds.
       152|      strcpy(bug, "ASDFGHJKLQWERTYUIOPHJKUYTF");
//**DETECT** cppcheck:      Memory leak: bug
       153|      return;
       154|
       155|  }
       156|
       157|  void
       158|  readmatrix(apr_array_header_t *data, double **a, double **b, double **x,
.......
bayzr и continue integration
В данной статье я приведу пример развертывания системы для статического анализа кода. Систсема будет состоять из таких компонент:
- CentOS7 x86_64
- bayzr
- bayzr-citool
- SonarQube
- squid
- yumbootstrap
Результат разворачивания данной системы:
- получение оценки качества кода
- визуальное ведение каждого обнаруженного недочета в исходном коде
- комплексный анализ проекта включающего различные языки программирования. Например: си в качестве бакэнда и python в качестве фронтэнда или в качестве утилит командной строки, а так же содержащий шелл скрипты
- организация дополнительной проверки в системе review
О SonarQube
SonarQube — платформа для проверки кода на качество по правилам, основанным на соглашениях и стандартах. Поддерживает более 20 различных языков программирования. Для дополнительного ознакомления с продуктом можно перейти по ссылке SonarQube
SonarQube поддерживает достаточно огромный арсенал статических анализаторов для различных языков, но некоторые из них - платные. Поэтому частично решить эту проблему я решил с помощью утилиты bayzr, которая помогает консолидировать и унифицировать вывод статических анализаторов и транспортировать этот вывод в SonarQube для дальнейшего анализа.
О bayzr-citool
Сам по себе SonarQube так же как и bayzr это статичные утилиты с веб-интефейсом, необходимо была утилита которая бы их объединяла, подготавливала каталоги где будут проходить анализ проекты, доустанавливала необходимые пакеты и создавала среду для сборки и анализа. особенно такой планировщик необходим для однотипных действий над одними и тем же проектами. Да-да-да, можно вспомнить про Jenkins, написать кучу шел скриптов для каждого проекта один раз и использовать их. При добавлении нового проекта брать шаблон шел сркипта и т.д и т.п. Хотелось чего-то более простого в конечном итоге. Поэтому был сделан и использован bayzr-citool. Сервис планировщик с веб-интерфейсом заточенный именно для связки SonarQube + bayzr.
О yumbotstrap
Кто прочитал статью выше, тот понял, что для анализа си/си++ проектов необходима и желательна сборка. Поэтому для сборки решено было использовать chrooted окружение, создается такой себе скелет каталогов эмулирующий систему и делается в нее chroot, там происходит доустановка необходимых пакетов и анализ, замусоривание. После анализа скелет удаляется не оставляя следа от среды сборки и анализа. yumbootstrap это более легковесный аналог mockbuild. Вот ссылка на страницу yumbootstrap
О squid
Обыкновенный прокси сервер, используемый yum для кеширования устанавливаемых пакетов. Для ускорения работы системы.
Установка
Для чистого CentOS 7 для стандартной сборки, достаточно все просто:
    yum install wget -y
    wget http://download.opensuse.org/repositories/home:/bayrepo/CentOS_7/home:bayrepo.repo -O /etc/yum.repos.d/home:bayrepo.repo
    yum install bayzr-citool -y
    citool -setup-run
Все. В ходе установки у вас спросят что-делать - выбирайте 1. И выбирайте версию SonarQube и пароль для базы данных. Если система чистая, то установка должна пройти без проблем. В результате получаем систему с установленными всеми компонентами. Готовую для дальнейшего тюннинга.
SonarQube настройте самостоятельно, а вот про настройки citool дальше.
citool
Если для сборки достаточно CentOS7 то все готово, в противном случае необходимо будет внести правки в файлы:
BAYZR и SONARQUBE пример работы с проектом
Исходные условия
Имею:
- IP: 192.168.0.116, необходим для демонстрации работы через веб
- ОС: CentOS Linux release 7.3, так же подойдет RHEL 7, Fedora 25. CentOS 6 и подобные тоже подойдут, но возможности будут серьезно ограничены, т.к https://build.opensuse.org/project/show/home:bayrepo репозиторий для 7-й версии имеет намного больше пакетов для аналитики.
- Архитектура: x86_64
- Объем памяти: 3Гб + 2Гб swap
- Объем HDD: 8Гб + 2Гб на каждую параллельную задачу, т.е если планируется 4 параллельных анализа то 4*2=8гб+8Гб=16Гб.
Установка
    yum install wget -y
    wget http://download.opensuse.org/repositories/home:/bayrepo/CentOS_7/home:bayrepo.repo -O /etc/yum.repos.d/home:bayrepo.repo
    yum install bayzr-citool -y
    citool -setup-run
Сервер для установки абсолютно чистый. Команда citool -setup-run спросит:
    [root@localhost ~]# citool -setup-run
    Welcome to management script of continue integration system
    Chose what should to do next:
      1) Install all needed components
      2) Create backups of installed components
      3) Restore from backup(bkp.zip)
    1/2/3 or q(quit) or e(exit) for next step
Выбираю - 1. Второй вопрос при установке:
    Chose version of SonarQube will be installed:
       1. SonarQube 6.0
       2. SonarQube 5.6
    Press 1 or 2
Выбираю снова - 1. Далее скрипт просит пароль задать для нового пользователя базы данных:
Set password for sonarqube database:Выбираю для примера Test1234567890
Загружается SonarQube, JDK, MySQL и прочие пакеты.
Данные пакеты, указывают на то, что установка прошла успешно:
    # rpm -qa | egrep "yumbootstrap|^java-|mysql-community|bayzr" | sort
    bayzr-0.2-28.1.x86_64
    bayzr-citool-0.2-28.1.x86_64
    java-1.8.0-openjdk-1.8.0.131-3.b12.el7_3.x86_64
    java-1.8.0-openjdk-devel-1.8.0.131-3.b12.el7_3.x86_64
    java-1.8.0-openjdk-headless-1.8.0.131-3.b12.el7_3.x86_64
    mysql-community-bench-5.6.36-2.el7.x86_64
    mysql-community-client-5.6.36-2.el7.x86_64
    mysql-community-common-5.6.36-2.el7.x86_64
    mysql-community-devel-5.6.36-2.el7.x86_64
    mysql-community-libs-5.6.36-2.el7.x86_64
    mysql-community-server-5.6.36-2.el7.x86_64
    yumbootstrap-0.0.3-7.2.noarch
Также указанные сервисы должны быть запущены:
    # ps aux | egrep "citool|SonarQube"
    root      1223  0.0  0.0  17808   744 ?        Sl   May26   0:00 /usr/local/sonar/bin/linux-x86-64/wrapper /usr/local/sonar/conf/wrapper.conf wrapper.syslog.ident=SonarQube wrapper.pidfile=/var/run/SonarQube.pid wrapper.daemonize=TRUE wrapper.lockfile=/var/lock/subsys/SonarQube
    checker   2315  0.0  0.3 182676  6176 tty2     Ssl+ May26   0:00 /usr/sbin/citool -server-run
    checker   2325  0.0  0.3 190872  7220 tty2     Sl+  May26   0:00 /usr/sbin/citool -job-runner 10
    root      2615  0.0  0.0 112648   976 pts/1    R+   00:01   0:00 grep -E --color=auto citool|SonarQube
Настройки по умолчанию
    # cat /etc/citool.ini
    [mysql]
    connect=bayzr:Test1234567890@tcp(127.0.0.1:3306)/bayzr?charset=utf8
    clean=10
    timetoclean=59 59 23 * * *

    [server]
    workers=10
wait=30- mysql->connect - строка соединения с базой данных, база уже создана установщиком
- mysql->clean - время жизни результата в базе, по умолчанию 10 дней
- mysql->timetoclean - строка в формате крон, для указания времени когда будет запускаться планировщиком задача по очистке базы
- server->workers - число обработчиков очереди
- server->wait - время в секундах на перечитывание задач и переинициализацию таймеров CI система с bayzr и SonarQube состоит из двух частей, это планировщик задач по анализированию кода и сам SonarQube. Планировщик содержит список проектов с параметрами, что проверять, какими анализаторами и какими файлами, куда сохранять результат, когда и как запускаться.
Так как интенсивность тестового проекта будет невысокой, сконфигурирую на две параллельных задачи: workres=2, остальные параметры оставлю без изменений и:
syetemtcl restart citoolПервый вход в web-интерфейс под администратором
введу в адресной строке браузера: http://192.168.0.116:11000. Логин: su_admin, Пароль: su_admin

попадаю на информационную страницу, которая описывает поля форм используемых в системе и доступных текущему пользователю. Существует четыре группы пользователей:
- Admin Group - самые широкие права, может изменять сведения о пользователях, создавать задачи, создавать процессы, смотреть результат выполнения процессов.
- Developer Group -
- User Group - не доступно ничего, кроме входа и информационной странички
- Viewer Group - может просматривать результат выполнения процессов и создавать новые процессы.
Задача - это описание параметров анализа, конфигурация анализируемых утилит, сведения откуда брать исходники, что из пакетов доустанавливать, когда запускать
Процесс - это постановка выбранной задачи в очередь на выполнение с указанием какой коммит, ветку или ref-change взять, для анализа
Из очереди процессов свободные воркеры выхватывают наиболее приоритетный и начинают выполенение. Приоритетов очередей аж 5. Приоритет выбирается при создании процесса.
Регистрация нового пользователя
Для регистрации нового пользователя необходимо зайти в форму Login и выбрать ссылку "Зарегистрироваться". В предложенной форме ввести:
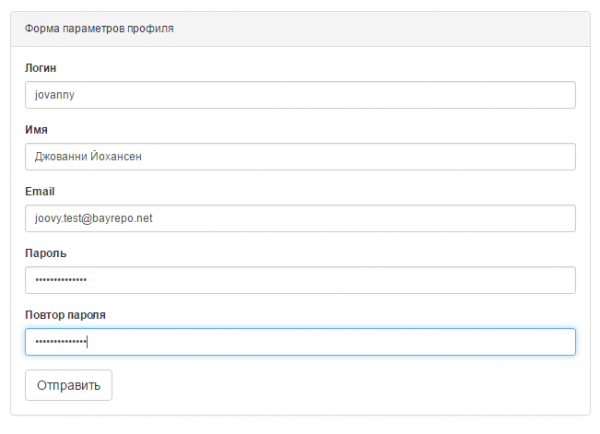
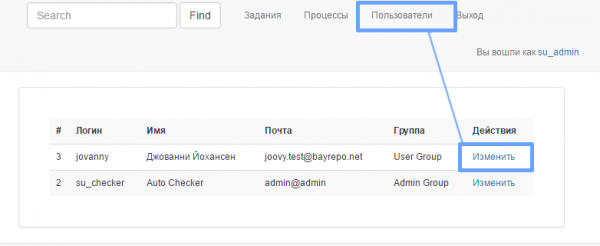
Для примера - создам пользователя jovanny. При входе от пользователя jovanny, ему не доступно ничего, т.к он получает роль по умолчанию - User Group. Зайду от пользователя su_admin и поменяю его права на более высокие, например Developer Group.
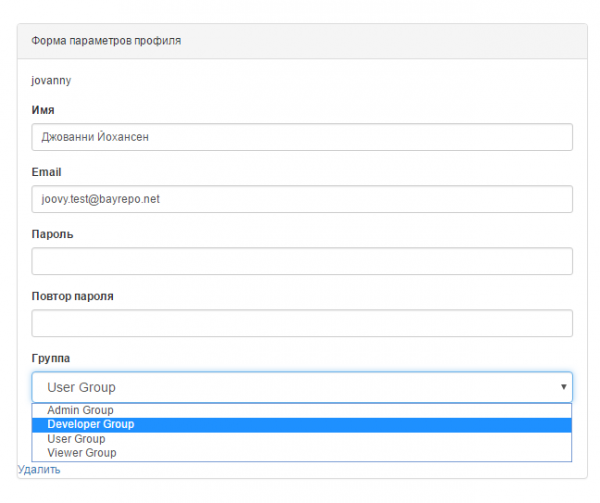
В открывшейся форме выберем Developer Group, потом нажмем кнопку "Отправить", сохраним параметры. Эта форма позволяет изменить параметры пользователя, изменить его пароль и даже удалить пользователя.
Теперь перелогинимся вновь под пользователем jovanny, для этого жмем меню "Выход". Пунктов меню стало больше. Создадим задачу. Сразу оговорюсь, что сборка и установка пакетов необходимых для сборки происходит в chroot, управление chroot происходит посредством yumbootstrap. По умолчанию, доступные среды для сборки хранятся в каталоге: /etc/yumbootstrap/suites/, но citool использует centos-7-mod.suite, этот сьют можно перенастроить на любую rpm подобную среду, например добавить epel репозитории и пр. Описание сьюта будет приведено ниже.
Содержимое yumbootstrap управляющих файлов
suite
    # cat /etc/yumbootstrap/suites/centos-7-mod.suite
    name = CentOS
    release = 7

    gpg_key =  gpg/RPM-GPG-KEY-CentOS-7
    gpg_key ?= gpg/RPM-GPG-KEY-CentOS-Security-7
    gpg_key ?= gpg/repomd.xml.key

    packages = packages/${suite}.list

    [main]
    cachedir=/yumbootstrap/cache
    logfile=/yumbootstrap/log/yum.log
    keepcache=0
    debuglevel=2
    exactarch=1
    obsoletes=1
    installonly_limit=5
    proxy=http://127.0.0.1:3128

    [post_install]
    finalize = scripts/addbayzr.py
    finalize = scripts/fix_rpmdb.py
    finalize = scripts/clean_yumbootstrap.py

    [repositories]
    centos         = http://mirror.centos.org/centos/7/os/$basearch/
    centos-updates = http://mirror.centos.org/centos/7/updates/$basearch/
    home_repo      = http://download.opensuse.org/repositories/home:/bayrepo/CentOS_7/
    centos-extras  = http://mirror.centos.org/centos/7/extras/$basearch/

    [environment]
    HOME=/root
    TERM="$TERM"
    PS1='\u:\w\$ '
    PATH=/bin:/usr/bin:/sbin:/usr/sbin
    OUT_USER=checker

    [cache]
    cache_dir = /usr/share/yumbotstrapcache
    cache_expire = 2592000

# vim:ft=dosini- в секции [main] вписываются ключи, которые помещаются в yum.conf внутри /etc в изолированном окружении. Из строки конфигурации видно, что настроен proxy параметр, для кеширования пакетов прокси сервером.
- в секции [post_install] содержится список скриптов, которые будут выполнены после подготовки окружения и внутри окружения.
- в секции [repositories] представлен список подключаемых URL репозиториев
- в секции [environment] описаны переменные окружения внутри среды
- в секции [cache] описан путь к кэшу и время жизни кеша в секундах, когда кэш считать просроченным. Это для ускорения подготовки среды. При наличии кэша, структура и скелет chroot окружения просто копируется без доп. подготовки.
list
    # cat /etc/yumbootstrap/suites/packages/centos-7-mod.list
    # subset from @Core
    coreutils
    bash
    grep
    gawk
    basesystem
    rpm
    initscripts
    iproute
    sudo
    shadow-utils

    # subset from @Base
    less
    make
    mktemp
    vim-minimal
    yum
    which
    #authconfig
    #dhclient
    chkconfig
    # graphical boot helper (used by initscripts)
    plymouth
    # ~root/.*
    rootfiles

    #utils
    bayzr
    pylint
    java-1.8.0-openjdk
    ~/usr/local/sonar-scanner
    ~/etc/resolv.conf
    ~/usr/bin/shellcheck
    gcc
    gcc-c++
    make
    cmake
    git
    bay-gcc61
    clang
    clang-analyzer
    cppcheck
    oclint
    rats
    splint
    pylint
    rpmlint
    frama-c
    +/var/lib/mysql
    +/usr/local/sonar
    +/dev
    +/proc

    # redhat-release
    centos-release

    # required to fix RPM DB
    /usr/bin/db_load
Это список файлов пакетов и каталогов, которые должны быть заранее подготовлены для окружения и уложены в кэш.
Записи типа aaaa:
    bayzr
    pylint
    java-1.8.0-openjdk
говорят, что указанные пакеты должны быть установлены
Записи типа ~aaaa:
    ~/usr/local/sonar-scanner
    ~/etc/resolv.conf
    ~/usr/bin/shellcheck
говорят, что при подготовке среды необходимо создать указанную структуру каталогов и добавить туда указанный файл из реальной системы
Записи типа +aaaa:
    +/var/lib/mysql
    +/usr/local/sonar
    +/dev
    +/proc
говорят, что указанные каталоги должны быть смонтированы на реальную систему на одноименные каталоги при разворачивании среды.
Заведем первую задачу
Выбираю меню "Задания"->"Создать новую задачу".
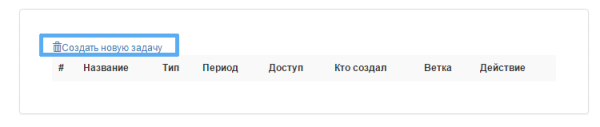
Задача - это список параметров и действий будущего процесса
- Название - название задачи(name[:key[:version]]) key и version необязательны, при их отсутсвии они будут созданы из name
- Тип результата - CommitCheck не отправлять результат в SonarQube; SonarQube - отправить результат в SonarQube
- Использовать коммит или ветку - использовать в качестве идентификатора изменений коммит или имя ветки или патчсет для gerrit
- Команда клонирования - полная команда клонирования проекта. git clone ... без git clone
- Пакеты для сборки проекта и Пакеты для сборки проекта ранее используемые - список пакетов, которые должны быть доустановлены в окружение для успешного анализа или сборки проекта(если сборка необходима)
- Команды сборки - список команд, каждая с новой строки, которые необходимо выполнить чтоб получить корректные исходные коды для анализа. Например для си-это может быть команда сборки проекта make VERBOSE=1 и т.д
- Тип периода - тип задачи, если Крон - то это периодическая задача, которую запускает сам сервис, иначе, Задача запускается вручную или по событию извне
- Время периода - описание крон задачи в крон формате https://godoc.org/github.com/robfig/cron
- Кто может запускать - список пользователей которым разрешен запуск, распространяется только на WEB API
- Конфигурация для анализаторов кода - bzr.conf со списком анализаторов и настроек игнорирования.
- Файл результата - имя файла результата проверки и путь к нему, если путь к нему не в корне git проекта, такое может быть если в пункте "Команды сборки" есть команды смены каталога
- Ветка для периодических задач - в какую ветку переключаться планировщику, при выполнении задачи по крону (только для Cron задач)
- Список проверяемых файлов - в результирующий отчет могут попасть либо все файлы исходных кодов из проверяемого коммита(ветки) или только те файлы которые были найдены в разнице двух коммитов указанных при создании процесса через запятую
- Команды выполняемые после аналитики - команды для shell скрипта, которые выполняются после анализа, в shell скрипт передаются параметры - 1 - параметр число найденных ошибок, 2 - путь к файлу отчета, 3 - вывод команд, 4 - id задачи, для извлечения дополнительных параметров из bayzr_JOBADDP. Данные команды могут быть использованы для нотификации и пр.
- Рабочий каталог в проекте - каталог относительно корня git проекта, где будет запущен sonar-scanner
- Команды выполняемые перед аналитикой от root - это уже не установка пакетов, это может быть yum update или установка модулей питона pip install ... и т.д
Пример заполнения:
для проекта mod_performance, периодическая проверка всего проекта с сохранением результата в SonarQube
| Название поля | Значение |
|---|---|
| Название(name[:key[:version]]) | mod_performance:0.4:0.4 |
| Тип результата | SonarQube |
| Использовать коммит или ветку | Ветку |
| Команда клонирования | https://github.com/bayrepo/mod_performance.git |
| Пакеты для сборки проекта | httpd-devel,apr-devel,gd-devel,sqlite3 для каждого пакета нужно нажать + и вписать имя пакета |
| Пакеты для сборки проекта ранее используемые | Ничего, т.к это первая задача |
Команды сборки (новая команда с новой строки) { {CHECK} } для вставки команды анализа исходников |
{ {CHECK} } make - { {CHECK} } это служебное слово, которое говорит, что в этой команде нужен анализ, до команды { {CHECK} } можно делать подготовительные для сборки или анализа команды, если проект только на питоне или на bash, то { {CHECK} } все равно нужно вызвать, но с командой { {CHECK} } echo 1, чтоб запустить событие проверки исходников |
| Тип периода | Крон |
| Время периода | 00 30 01 * |
| Кто может запускать | Выбираем всех доступных пользователей |
| Конфигурация для анализаторов кода | Т.к у меня в примере C-проект, то конфигурация по-умолчанию подходит, оставляю без изменений, проверка cppcheck |
| Файл результата | report.html - из предыдущей настройки |
| Ветка для периодических задач | master - т.к исходники беру из ветки master |
| Список проверяемых файлов | Полный список |
| Команды выполняемые после аналитики(записываются в скрипт). 1 - параметр число найденных ошибок, 2 - путь к файлу отчета, 3 - вывод команд | пусто, ничего не запускаем |
| Рабочий каталог в проекте | пусто, т.к никуда при подготовке не переходим |
| Команды выполняемые перед аналитикой от root | пусто, т.к никаких действий требующих прав суперпользователя не нужно, здесь можно вставить yum install, pip install и прочее |
Сохраняем.
Получаем вывод:

Задача создана и подтянута кроном. Теперь процесс создастся автоматически. Эту задачу можно включить и для процесса, созданного вручную.
Задача для запуска вручную или через API
По сути у этой задачи все будет как у предыдущей за исключением нескольких полей:
| Название поля | Значение |
|---|---|
| Название(name[:key[:version]]) | mod_performance:manual:0.4 |
| Тип результата | Commit check |
| Использовать коммит или ветку | Коммит |
| Пакеты для сборки проекта ранее используемые | httpd-devel,apr-devel,gd-devel,sqlite3 |
| Тип периода | Без периода |
| Время периода | пусто |
| Ветка для периодических задач | пусто |
| Список проверяемых файлов | Только измененные файлы |
Теперь первая задача при запуске репортует в SonarQube, вторая оставляет только внутрений результат проверки.
Каждая созданная задача может быть удалена "Удалить" или изменена "Изменить" напротив имени указанной задачи. Внимание!!! Подтверждение на удаление не спрашивается.
Процессы
Перейдем в меню "Процессы". На картинке видно, что было запущено несколько процессов, один - это созданная ранее крон задача.
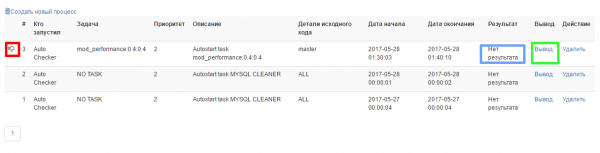
Красным квадратом выделена область статуса - если она пустая, то задача или выполняется или уже успешно выполнена. Если там изображение перевернутой руки - это значит, что во время анализа произошли проблемы. Лог сборки и анализа можно найти по ссылке обведенной зеленым квадратом на рисунке. Синий квадрат содержит ссылку на результат анализа или сообщение "Нет результата".
Создадим задачу, появится окно с параметрами:
Процесс - это запущенная Задача с заданными параметрами. Результатом работы процесса является отчет о результатах проверки кода или сообщение об ошибке
- Название - название процесса, уникальное имя выполняемого задания
- Приоритет - приоритет выполнения процесса. При запросе анализа, процесс запускается не мгновенно, а попадает в очередь процессов. Из каждой очереди выбирается запрос на процесс с меньшим идентификатором. Порядок и очередность пересмотра очередей: первой пересматривается очередь с приоритетом Экстремальный, потом Высокий, потом Стандартный и наконец - Низкий
- Идентификатор изменения - идентификатор изменения в системе контроля версий (имя ветки, коммит, или разница между коммитами). Для разницы коммитов два коммита должны быть указаны через запятую. В качестве идентификатора может быть: имя ветки без remotes и origin(для задачити типа Ветка), или коммит или два коммита через запятую(для задачи типа Коммит)
- Задача - название задачи, параметры которой будут использованы
- Дополнительное описание - любой комментарий, может быть пустым
Запустим процесс вручную для задачи mod_performance:manual:0.4
| Название поля | Значение |
|---|---|
| Название | первый ручной процесс |
| Приоритет | Стандартный |
| Идентификатор изменения в системе контроля версий (имя ветки, коммит, или разница между коммитами). Для разницы коммитов два коммита должны быть указаны через запятую | a50002ecbd1644478e3153a1d1dcc1218a43c333 |
| Задача | mod_performance:manual:0.4 |
| Дополнительное описание | первый ручной процесс |
Вывод
Вывод каждой задачи логирует stderr и stdout каждой выполняемой команды. Для просмотра вывода, нужно нажать на ссылку напротив требуемого процесса. Пример вывода:

Красным цветом подсвечены строки из stderr, былые строки - из stdout, зеленые - это команда которая выполнялась.
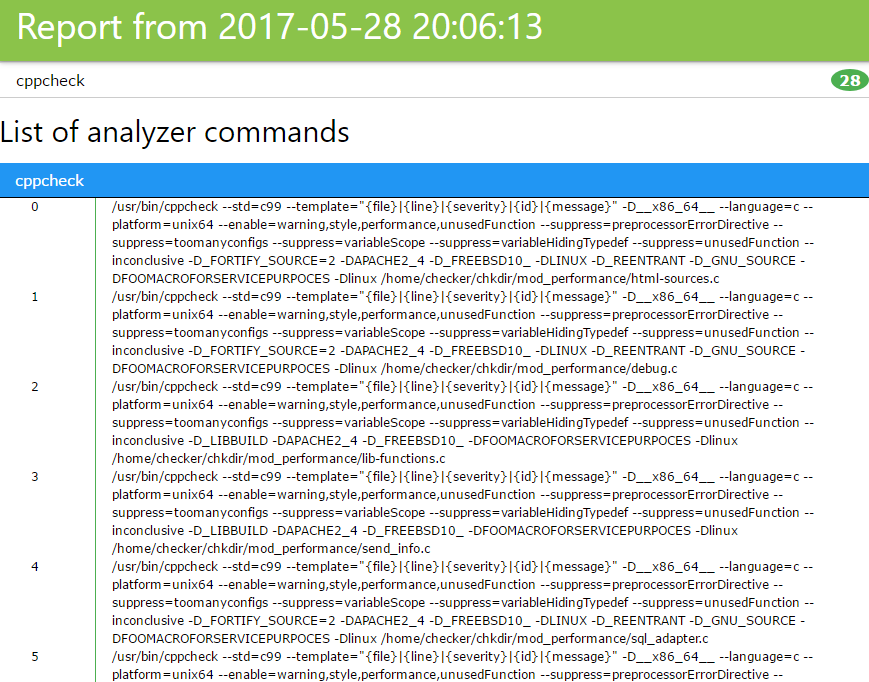
Результат выполнения
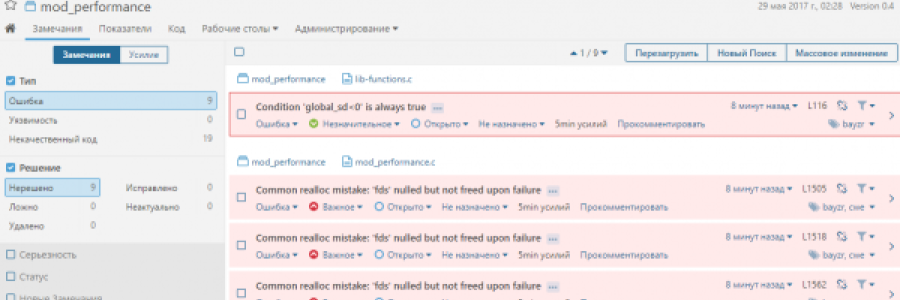
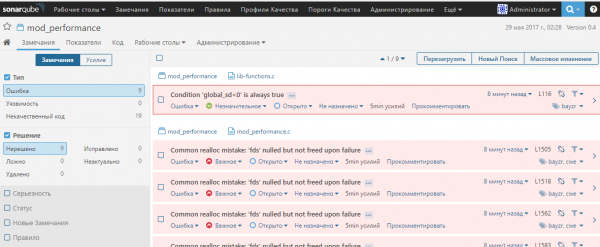
Результат проверки выглядит следующим образом:

Страница разбита на секции:
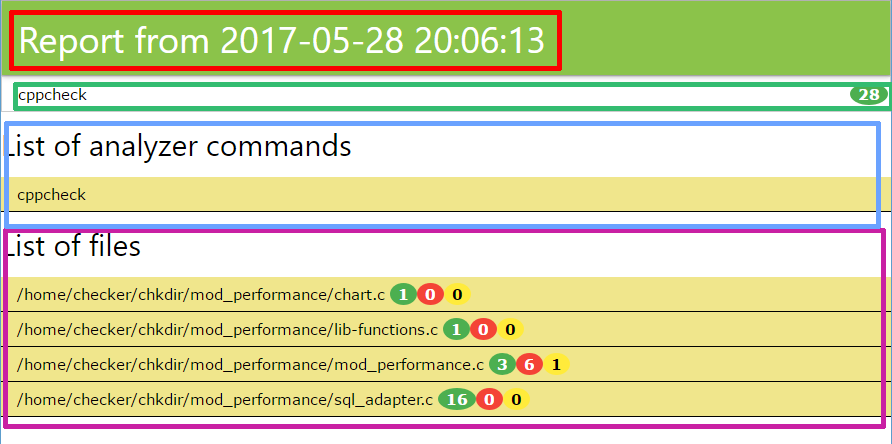
- Красная - название отчета и время
- Зеленая - информация о том, сколько каждый анализатор для задачи нашел ошибок и предупреждений
- Синяя - список команд анализаторов, которые запускались для анализа исходных кодов
- Сиреневая - список ошибок, каждая строка разворачивается и содержит вырезку кода с подсвеченной ошибкой
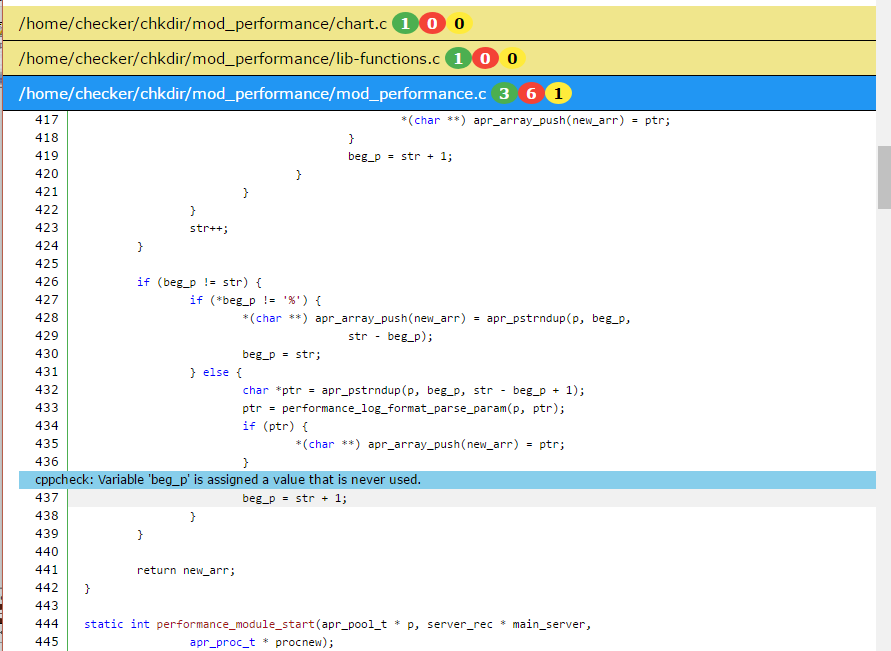
Красным цветом подсвечиваются критические ошибки, желтым - предупреждения, синим - информационные.
Запуск процесса через WEB-API
Для запуска процесса через web-api или из автоматизированных утилит необходимо сформировать запрос вида:
curl -u {LOGIN}:{USER_TOKEN} --data "user_token={USER_TOKEN}&task_token={TASK_TOKEN}&commit={CHANGE_ID}&descr={DESCRIPTION}&{ADDPARAMS}" http://{SERVER_IP}:11000/api/jobjsonгде:
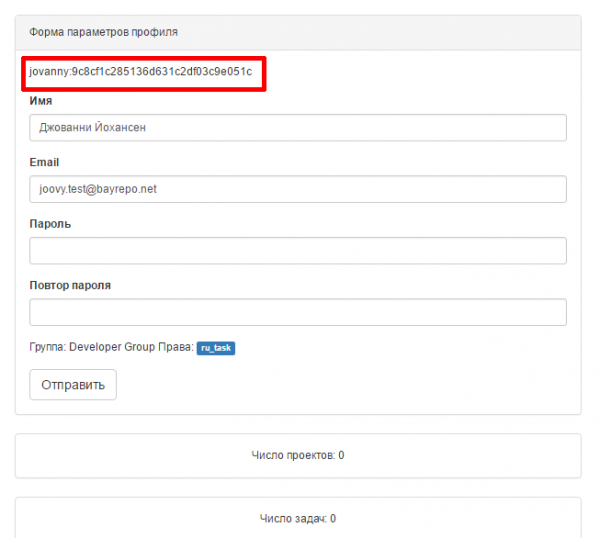
{LOGIN}:{USER_TOKEN} это:
перейти по ссылке:

требуемый {LOGIN}:{USER_TOKEN} выделены красным:
{TASK_TOKEN} - переходим в меню "Задания", нажимаем "Изменить" напротив требуемого задания и в открывшемся окне берем идентификатор выделенный красным:
{CNANGE_ID} - имя ветки, номер коммита, ref change для геррит
{DESCRIPTION} - описание процесса
{ADDPARAMS} - любое число дополнительных параметров в виде param1=value1¶m2=value2&... Эти параметры будут сохранены в базе данных и могут быть использованы пост скриптом.
Пример:
curl -u jovanny:9c8cf1c285136d631c2df03c9e051c --data "user_token=9c8cf1c285136d631c2df03c9e051c&task_token=1c418fa991b46dd0b53f69b4e3b916&commit=b9c744bde897764ce6b71161d38ed02650157e22&descr=Task1¤tdate=UNUSE" http://192.168.0.116:11000/api/jobjsonСтруктура базы данных
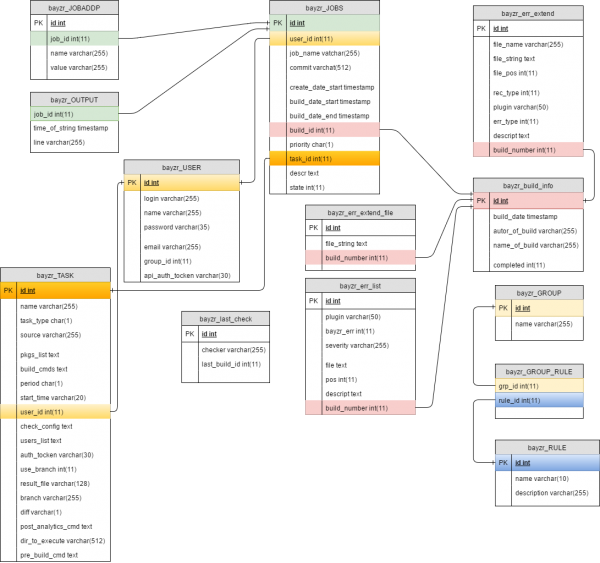
Автоматическая очистка базы данных
Ежедневно планировщиком задач запускается задача по очистке базы данных. Задача проверяет все старые сборки старше mysql->clean=10 дней, а также сборки никому не принадлежащие, ошибочные и прочее и удаляет их. Такая запись выглядит как:

и содержит такой вывод:

Записи в выводе показывают цифры удаленных строк в базе данных.
Краткий обзор результатов в SonarQube
Для сбора информации в SonarQube необходимо активировать правила плагина bayzr. Для этого необходимо:
- Зайти по адресу 192.168.0.116:9000 и залогиниться как администратор: admin:admin
- Перейти в пункт меню: Правила, выбрать фильтр bayzr и выбрать Язык - Cpp.Нажать на кнопку "Массовое изменение"
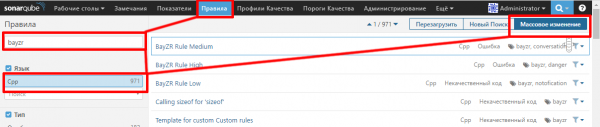
- В выпавшем меню выбрать - Активировать в ..., согласиться с предложенным вариантом
Все
Пример результата анализа в SonarQube: 1.

2.

3.
bayzr и SonarQube установка вручную
- wget http://download.opensuse.org/repositories/home:/bayrepo/CentOS_7/home:bayrepo.repo -O /etc/yum.repos.d/home:bayrepo.repo
- yum install bayzr-citool -y
- yum install wget -y
- yum install unzip -y
- yum install yum-utils -y
- yum install java-1.8.0-openjdk java-1.8.0-openjdk-headless java-1.8.0-openjdk-devel -y
- yum install chkconfig -y
- alternatives --install /usr/bin/java java /opt/jdk1.8.0_101/bin/java 2
- firewall-cmd --zone=public --add-port=8080/tcp --permanent
- firewall-cmd --zone=public --add-port=9000/tcp --permanent
- firewall-cmd --zone=public --add-port=11000/tcp --permanent
- firewall-cmd --zone=public --add-service=http --permanent
- firewall-cmd --reload
- wget https://sonarsource.bintray.com/Distribution/sonar-scanner-cli/sonar-scanner-2.6.1.zip
- unzip sonar-scanner-2.6.1.zip
- "wget https://sonarsource.bintray.com/Distribution/sonarqube/sonarqube-6.4.zip
- unzip sonarqube-6.4.zip
- mv -n sonarqube-6.4 /usr/local
- ln -s /usr/local/sonarqube-6.4/ /usr/local/sonar
- mv -n sonar-scanner-2.6.1 /usr/local
- ln -s /usr/local/sonar-scanner-2.6.1 /usr/local/sonar-scanner
- rpm -ihv http://dev.mysql.com/get/mysql57-community-release-el7-8.noarch.rpm
- yum-config-manager --enable mysql56-community
- yum-config-manager --disable mysql57-community
- yum -y install mysql-community-common mysql-community-bench mysql-community-server mysql-connector-java mysql-connector-odbc mysql-community-client mysql-connector-python mysql-community-libs mysql-community-devel
- systemctl enable mysqld
- systemctl start mysqld
- mysql -e "CREATE DATABASE sonar CHARACTER SET utf8 COLLATE utf8_general_ci;"
- mysql -e "CREATE USER 'sonar' IDENTIFIED BY 'PASSWD';"
- mysql -e "GRANT ALL ON sonar.* TO 'sonar'@'%' IDENTIFIED BY 'PASSWD';"
- mysql -e "GRANT ALL ON sonar.* TO 'sonar'@'localhost' IDENTIFIED BY 'PASSWD';"
- mysql -e "FLUSH PRIVILEGES;"
- touch /etc/init.d/sonar и добавить содержимое:
/etc/init.d/sonar
#! /bin/sh
#
# Copyright (c) 1999, 2006 Tanuki Software Inc.
#
# Java Service Wrapper sh script.  Suitable for starting and stopping
#  wrapped Java applications on UNIX platforms.
#
#-----------------------------------------------------------------------------
# These settings can be modified to fit the needs of your application
# Default values for the Application variables, below.
#
# NOTE: The build for specific applications may override this during the resource-copying

# phase, to fill in a concrete name and avoid the use of the defaults specified here.
SONAR_HOME=/usr/local/sonar
PLATFORM=linux-x86-64

DEF_APP_NAME="SonarQube"
DEF_APP_LONG_NAME="SonarQube"

# Application

APP_NAME="${DEF_APP_NAME}"
APP_LONG_NAME="${DEF_APP_LONG_NAME}"

WRAPPER_CMD="${SONAR_HOME}/bin/${PLATFORM}/wrapper"
WRAPPER_CONF="${SONAR_HOME}/conf/wrapper.conf"
# Wrapper

#WRAPPER_CMD="./wrapper"
#WRAPPER_CONF="../../conf/wrapper.conf"

# Priority at which to run the wrapper.  See "man nice" for valid priorities.

#  nice is only used if a priority is specified.
PRIORITY=

# Location of the pid file.

#PIDDIR="."
PIDDIR="/var/run"

# If uncommented, causes the Wrapper to be shutdown using an anchor file.

#  When launched with the 'start' command, it will also ignore all INT and
#  TERM signals.

#IGNORE_SIGNALS=true

# If specified, the Wrapper will be run as the specified user.

# IMPORTANT - Make sure that the user has the required privileges to write
#  the PID file and wrapper.log files.  Failure to be able to write the log

#  file will cause the Wrapper to exit without any way to write out an error
#  message.

# NOTE - This will set the user which is used to run the Wrapper as well as
#  the JVM and is not useful in situations where a privileged resource or

#  port needs to be allocated prior to the user being changed.
#RUN_AS_USER=

# The following two lines are used by the chkconfig command. Change as is

#  appropriate for your application.  They should remain commented.
# chkconfig: 2345 20 80

# description: Test Wrapper Sample Application

# Do not modify anything beyond this point

#-----------------------------------------------------------------------------

# Get the fully qualified path to the script

case $0 in
    /*)
        SCRIPT="$0"
        ;;

    *)
        PWD=`pwd`
        SCRIPT="$PWD/$0"
        ;;
esac

# Resolve the true real path without any sym links.

CHANGED=true
while [ "X$CHANGED" != "X" ]
do
    # Change spaces to ":" so the tokens can be parsed.
    SAFESCRIPT=`echo $SCRIPT | sed -e 's; ;:;g'`
    # Get the real path to this script, resolving any symbolic links
    TOKENS=`echo $SAFESCRIPT | sed -e 's;/; ;g'`
    REALPATH=
    for C in $TOKENS; do
        # Change any ":" in the token back to a space.
        C=`echo $C | sed -e 's;:; ;g'`
        REALPATH="$REALPATH/$C"
        # If REALPATH is a sym link, resolve it.  Loop for nested links.
        while [ -h "$REALPATH" ] ; do
            LS="`ls -ld "$REALPATH"`"
            LINK="`expr "$LS" : '.*-> \(.*\)$'`"
            if expr "$LINK" : '/.*' > /dev/null; then
                # LINK is absolute.
                REALPATH="$LINK"
            else
                # LINK is relative.
                REALPATH="`dirname "$REALPATH"`""/$LINK"
            fi
        done
    done

    if [ "$REALPATH" = "$SCRIPT" ]
    then
        CHANGED=""
    else
        SCRIPT="$REALPATH"
    fi
done

# Change the current directory to the location of the script

cd "`dirname "$REALPATH"`"
REALDIR=`pwd`

# If the PIDDIR is relative, set its value relative to the full REALPATH to avoid problems if

#  the working directory is later changed.
FIRST_CHAR=`echo $PIDDIR | cut -c1,1`
if [ "$FIRST_CHAR" != "/" ]
then
    PIDDIR=$REALDIR/$PIDDIR
fi
# Same test for WRAPPER_CMD

FIRST_CHAR=`echo $WRAPPER_CMD | cut -c1,1`
if [ "$FIRST_CHAR" != "/" ]
then
    WRAPPER_CMD=$REALDIR/$WRAPPER_CMD
fi
# Same test for WRAPPER_CONF

FIRST_CHAR=`echo $WRAPPER_CONF | cut -c1,1`
if [ "$FIRST_CHAR" != "/" ]
then
    WRAPPER_CONF=$REALDIR/$WRAPPER_CONF
fi

# Process ID

ANCHORFILE="$PIDDIR/$APP_NAME.anchor"
PIDFILE="$PIDDIR/$APP_NAME.pid"
LOCKDIR="/var/lock/subsys"
LOCKFILE="$LOCKDIR/$APP_NAME"
pid=""

# Resolve the location of the 'ps' command

PSEXE="/usr/bin/ps"
if [ ! -x "$PSEXE" ]
then
    PSEXE="/bin/ps"
    if [ ! -x "$PSEXE" ]
    then
        echo "Unable to locate 'ps'."
        echo "Please report this message along with the location of the command on your system."
        exit 1
    fi
fi

# Resolve the os

DIST_OS=`uname -s | tr [:upper:] [:lower:] | tr -d [:blank:]`
case "$DIST_OS" in
    'sunos')
        DIST_OS="solaris"
        ;;
    'hp-ux' | 'hp-ux64')
        DIST_OS="hpux"
        ;;
    'darwin')
        DIST_OS="macosx"
        ;;
    'unix_sv')
        DIST_OS="unixware"
        ;;
esac

# Resolve the architecture

DIST_ARCH=`uname -p | tr [:upper:] [:lower:] | tr -d [:blank:]`
if [ "$DIST_ARCH" = "unknown" ]
then
    DIST_ARCH=`uname -m | tr [:upper:] [:lower:] | tr -d [:blank:]`
fi
case "$DIST_ARCH" in
    'amd64' | 'athlon' | 'ia32' | 'ia64' | 'i386' | 'i486' | 'i586' | 'i686' | 'x86_64')
        DIST_ARCH="x86"
        ;;
    'ip27')
        DIST_ARCH="mips"
        ;;
    'power' | 'powerpc' | 'power_pc' | 'ppc64')
        DIST_ARCH="ppc"
        ;;
    'pa_risc' | 'pa-risc')
        DIST_ARCH="parisc"
        ;;
    'sun4u' | 'sparcv9')
        DIST_ARCH="sparc"
        ;;
    '9000/800')
        DIST_ARCH="parisc"
        ;;
esac

outputFile() {
    if [ -f "$1" ]
    then
        echo "  $1 (Found but not executable.)";
    else
        echo "  $1"
    fi
}

# Decide on the wrapper binary to use.

# If a 32-bit wrapper binary exists then it will work on 32 or 64 bit
#  platforms, if the 64-bit binary exists then the distribution most

#  likely wants to use long names.  Otherwise, look for the default.
# For macosx, we also want to look for universal binaries.

WRAPPER_TEST_CMD="$WRAPPER_CMD-$DIST_OS-$DIST_ARCH-32"
if [ -x "$WRAPPER_TEST_CMD" ]
then
    WRAPPER_CMD="$WRAPPER_TEST_CMD"
else
    if [ "$DIST_OS" = "macosx" ]
    then
        WRAPPER_TEST_CMD="$WRAPPER_CMD-$DIST_OS-universal-32"
        if [ -x "$WRAPPER_TEST_CMD" ]
        then
            WRAPPER_CMD="$WRAPPER_TEST_CMD"
        else
            WRAPPER_TEST_CMD="$WRAPPER_CMD-$DIST_OS-$DIST_ARCH-64"
            if [ -x "$WRAPPER_TEST_CMD" ]
            then
                WRAPPER_CMD="$WRAPPER_TEST_CMD"
            else
                WRAPPER_TEST_CMD="$WRAPPER_CMD-$DIST_OS-universal-64"
                if [ -x "$WRAPPER_TEST_CMD" ]
                then
                    WRAPPER_CMD="$WRAPPER_TEST_CMD"
                else
                    if [ ! -x "$WRAPPER_CMD" ]
                    then
                        echo "Unable to locate any of the following binaries:"
                        outputFile "$WRAPPER_CMD-$DIST_OS-$DIST_ARCH-32"
                        outputFile "$WRAPPER_CMD-$DIST_OS-universal-32"
                        outputFile "$WRAPPER_CMD-$DIST_OS-$DIST_ARCH-64"
                        outputFile "$WRAPPER_CMD-$DIST_OS-universal-64"
                        outputFile "$WRAPPER_CMD"
                        exit 1
                    fi
                fi
            fi
        fi
    else
        WRAPPER_TEST_CMD="$WRAPPER_CMD-$DIST_OS-$DIST_ARCH-64"
        if [ -x "$WRAPPER_TEST_CMD" ]
        then
            WRAPPER_CMD="$WRAPPER_TEST_CMD"
        else
            if [ ! -x "$WRAPPER_CMD" ]
            then
                echo "Unable to locate any of the following binaries:"
                outputFile "$WRAPPER_CMD-$DIST_OS-$DIST_ARCH-32"
                outputFile "$WRAPPER_CMD-$DIST_OS-$DIST_ARCH-64"
                outputFile "$WRAPPER_CMD"
                exit 1
            fi
        fi
    fi
fi

# Build the nice clause

if [ "X$PRIORITY" = "X" ]
then
    CMDNICE=""
else
    CMDNICE="nice -$PRIORITY"
fi

# Build the anchor file clause.

if [ "X$IGNORE_SIGNALS" = "X" ]
then
   ANCHORPROP=
   IGNOREPROP=
else
   ANCHORPROP=wrapper.anchorfile=\"$ANCHORFILE\"
   IGNOREPROP=wrapper.ignore_signals=TRUE
fi

# Build the lock file clause.  Only create a lock file if the lock directory exists on this platform.

LOCKPROP=
if [ -d $LOCKDIR ]
then
    if [ -w $LOCKDIR ]
    then
        LOCKPROP=wrapper.lockfile=\"$LOCKFILE\"
    fi
fi

checkUser() {
    # $1 touchLock flag
    # $2 command

    # Check the configured user.  If necessary rerun this script as the desired user.
    if [ "X$RUN_AS_USER" != "X" ]
    then
        # Resolve the location of the 'id' command
        IDEXE="/usr/xpg4/bin/id"
        if [ ! -x "$IDEXE" ]
        then
            IDEXE="/usr/bin/id"
            if [ ! -x "$IDEXE" ]
            then
                echo "Unable to locate 'id'."
                echo "Please report this message along with the location of the command on your system."
                exit 1
            fi
        fi

        if [ "`$IDEXE -u -n`" = "$RUN_AS_USER" ]
        then
            # Already running as the configured user.  Avoid password prompts by not calling su.
            RUN_AS_USER=""
        fi
    fi
    if [ "X$RUN_AS_USER" != "X" ]
    then
        # If LOCKPROP and $RUN_AS_USER are defined then the new user will most likely not be
        # able to create the lock file.  The Wrapper will be able to update this file once it
        # is created but will not be able to delete it on shutdown.  If $2 is defined then
        # the lock file should be created for the current command
        if [ "X$LOCKPROP" != "X" ]
        then
            if [ "X$1" != "X" ]
            then
                # Resolve the primary group
                RUN_AS_GROUP=`groups $RUN_AS_USER | awk '{print $3}' | tail -1`
                if [ "X$RUN_AS_GROUP" = "X" ]
                then
                    RUN_AS_GROUP=$RUN_AS_USER
                fi
                touch $LOCKFILE
                chown $RUN_AS_USER:$RUN_AS_GROUP $LOCKFILE
            fi
        fi

        # Still want to change users, recurse.  This means that the user will only be
        #  prompted for a password once. Variables shifted by 1
        su -m $RUN_AS_USER -c "\"$REALPATH\" $2"
        RETVAL=$?

        # Now that we are the original user again, we may need to clean up the lock file.
        if [ "X$LOCKPROP" != "X" ]
        then
            getpid
            if [ "X$pid" = "X" ]
            then
                # Wrapper is not running so make sure the lock file is deleted.
                if [ -f "$LOCKFILE" ]
                then
                    rm "$LOCKFILE"
                fi
            fi
        fi

        exit $RETVAL
    fi
}

getpid() {
    if [ -f "$PIDFILE" ]
    then
        if [ -r "$PIDFILE" ]
        then
            pid=`cat "$PIDFILE"`
            if [ "X$pid" != "X" ]
            then
                # It is possible that 'a' process with the pid exists but that it is not the
                #  correct process.  This can happen in a number of cases, but the most
                #  common is during system startup after an unclean shutdown.
                # The ps statement below looks for the specific wrapper command running as
                #  the pid.  If it is not found then the pid file is considered to be stale.
                pidtest=`$PSEXE -p $pid -o args | grep "$WRAPPER_CMD" | tail -1`
                if [ "X$pidtest" = "X" ]
                then
                    # This is a stale pid file.
                    rm -f "$PIDFILE"
                    echo "Removed stale pid file: $PIDFILE"
                    pid=""
                fi
            fi
        else
            echo "Cannot read $PIDFILE."
            exit 1
        fi
    fi
}

testpid() {
    pid=`$PSEXE -p $pid | grep $pid | grep -v grep | awk '{print $1}' | tail -1`
    if [ "X$pid" = "X" ]
    then
        # Process is gone so remove the pid file.
        rm -f "$PIDFILE"
        pid=""
    fi
}

console() {
    echo "Running $APP_LONG_NAME..."
    getpid
    if [ "X$pid" = "X" ]
    then
        # The string passed to eval must handles spaces in paths correctly.
        COMMAND_LINE="$CMDNICE \"$WRAPPER_CMD\" \"$WRAPPER_CONF\" wrapper.syslog.ident=$APP_NAME wrapper.pidfile=\"$PIDFILE\" $ANCHORPROP $LOCKPROP"
        eval $COMMAND_LINE
    else
        echo "$APP_LONG_NAME is already running."
        exit 1
    fi
}

start() {
    echo "Starting $APP_LONG_NAME..."
    getpid
    if [ "X$pid" = "X" ]
    then
        # The string passed to eval must handles spaces in paths correctly.
        COMMAND_LINE="$CMDNICE \"$WRAPPER_CMD\" \"$WRAPPER_CONF\" wrapper.syslog.ident=$APP_NAME wrapper.pidfile=\"$PIDFILE\" wrapper.daemonize=TRUE $ANCHORPROP $IGNOREPROP $LOCKPROP"
        eval $COMMAND_LINE
    else
        echo "$APP_LONG_NAME is already running."
        exit 1
    fi
    getpid
    if [ "X$pid" != "X" ]
    then
        echo "Started $APP_LONG_NAME."
    else
        echo "Failed to start $APP_LONG_NAME."
    fi
}

stopit() {
    echo "Stopping $APP_LONG_NAME..."
    getpid
    if [ "X$pid" = "X" ]
    then
        echo "$APP_LONG_NAME was not running."
    else
        if [ "X$IGNORE_SIGNALS" = "X" ]
        then
            # Running so try to stop it.
            kill $pid
            if [ $? -ne 0 ]
            then
                # An explanation for the failure should have been given
                echo "Unable to stop $APP_LONG_NAME."
                exit 1
            fi
        else
            rm -f "$ANCHORFILE"
            if [ -f "$ANCHORFILE" ]
            then
                # An explanation for the failure should have been given
                echo "Unable to stop $APP_LONG_NAME."
                exit 1
            fi
        fi

        # We can not predict how long it will take for the wrapper to
        #  actually stop as it depends on settings in wrapper.conf.
        #  Loop until it does.
        savepid=$pid
        CNT=0
        TOTCNT=0
        while [ "X$pid" != "X" ]
        do
            # Show a waiting message every 5 seconds.
            if [ "$CNT" -lt "5" ]
            then
                CNT=`expr $CNT + 1`
            else
                echo "Waiting for $APP_LONG_NAME to exit..."
                CNT=0
            fi
            TOTCNT=`expr $TOTCNT + 1`

            sleep 1

            testpid
        done

        pid=$savepid
        testpid
        if [ "X$pid" != "X" ]
        then
            echo "Failed to stop $APP_LONG_NAME."
            exit 1
        else
            echo "Stopped $APP_LONG_NAME."
        fi
    fi
}

status() {
    getpid
    if [ "X$pid" = "X" ]
    then
        echo "$APP_LONG_NAME is not running."
        exit 1
    else
        echo "$APP_LONG_NAME is running ($pid)."
        exit 0
    fi
}

dump() {
    echo "Dumping $APP_LONG_NAME..."
    getpid
    if [ "X$pid" = "X" ]
    then
        echo "$APP_LONG_NAME was not running."

    else
        kill -3 $pid

        if [ $? -ne 0 ]
        then
            echo "Failed to dump $APP_LONG_NAME."
            exit 1
        else
            echo "Dumped $APP_LONG_NAME."
        fi
    fi
}

case "$1" in

    'console')
        checkUser touchlock $1
        console
        ;;

    'start')
        checkUser touchlock $1
        start
        ;;

    'stop')
        checkUser "" $1
        stopit
        ;;

    'restart')
        checkUser touchlock $1
        stopit
        start
        ;;

    'status')
        checkUser "" $1
        status
        ;;

    'dump')
        checkUser "" $1
        dump
        ;;

    *)
        echo "Usage: $0 { console | start | stop | restart | status | dump }"
        exit 1
        ;;
esac

exit 0- chmod 755 /etc/init.d/sonar
- touch /usr/local/sonar/conf/sonar.properties с содержимым:
/usr/local/sonar/conf/sonar.properties
# Property values can:

# - reference an environment variable, for example sonar.jdbc.url= ${env:SONAR_JDBC_URL}
# - be encrypted. See http://redirect.sonarsource.com/doc/settings-encryption.html

#--------------------------------------------------------------------------------------------------

# DATABASE
#

# IMPORTANT: the embedded H2 database is used by default. It is recommended for tests but not for
# production use. Supported databases are MySQL, Oracle, PostgreSQL and Microsoft SQLServer.

# User credentials.

# Permissions to create tables, indices and triggers must be granted to JDBC user.
# The schema must be created first.

#sonar.jdbc.username=
#sonar.jdbc.password=

#----- Embedded Database (default)

# H2 embedded database server listening port, defaults to 9092
#sonar.embeddedDatabase.port=9092

#----- MySQL 5.6 or greater
# Only InnoDB storage engine is supported (not myISAM).

# Only the bundled driver is supported. It can not be changed.
#sonar.jdbc.url=jdbc:mysql://localhost:3306/sonar?useUnicode=true&characterEncoding=utf8&rewriteBatchedStatements=true&useConfigs=maxPerformance

#----- Oracle 11g/12c

# - Only thin client is supported
# - Only versions 11.2.x and 12.x of Oracle JDBC driver are supported

# - The JDBC driver must be copied into the directory extensions/jdbc-driver/oracle/
# - If you need to set the schema, please refer to http://jira.sonarsource.com/browse/SONAR-5000

#sonar.jdbc.url=jdbc:oracle:thin:@localhost:1521/XE

#----- PostgreSQL 8.x/9.x

# If you don't use the schema named "public", please refer to http://jira.sonarsource.com/browse/SONAR-5000
#sonar.jdbc.url=jdbc:postgresql://localhost/sonar

#----- Microsoft SQLServer 2008/2012/2014 and SQL Azure

# A database named sonar must exist and its collation must be case-sensitive (CS) and accent-sensitive (AS)
# Use the following connection string if you want to use integrated security with Microsoft Sql Server

# Do not set sonar.jdbc.username or sonar.jdbc.password property if you are using Integrated Security
# For Integrated Security to work, you have to download the Microsoft SQL JDBC driver package from

# http://www.microsoft.com/en-us/download/details.aspx?displaylang=en&id=11774
# and copy sqljdbc_auth.dll to your path. You have to copy the 32 bit or 64 bit version of the dll

# depending upon the architecture of your server machine.
# This version of SonarQube has been tested with Microsoft SQL JDBC version 4.1

#sonar.jdbc.url=jdbc:sqlserver://localhost;databaseName=sonar;integratedSecurity=true

# Use the following connection string if you want to use SQL Auth while connecting to MS Sql Server.

# Set the sonar.jdbc.username and sonar.jdbc.password appropriately.
#sonar.jdbc.url=jdbc:sqlserver://localhost;databaseName=sonar

#----- Connection pool settings

# The maximum number of active connections that can be allocated
# at the same time, or negative for no limit.

# The recommended value is 1.2 * max sizes of HTTP pools. For example if HTTP ports are
# enabled with default sizes (50, see property sonar.web.http.maxThreads)

# then sonar.jdbc.maxActive should be 1.2 * (50) = 120.
#sonar.jdbc.maxActive=60

# The maximum number of connections that can remain idle in the

# pool, without extra ones being released, or negative for no limit.
#sonar.jdbc.maxIdle=5

# The minimum number of connections that can remain idle in the pool,

# without extra ones being created, or zero to create none.
#sonar.jdbc.minIdle=2

# The maximum number of milliseconds that the pool will wait (when there

# are no available connections) for a connection to be returned before
# throwing an exception, or <= 0 to wait indefinitely.

#sonar.jdbc.maxWait=5000

#sonar.jdbc.minEvictableIdleTimeMillis=600000

#sonar.jdbc.timeBetweenEvictionRunsMillis=30000

#--------------------------------------------------------------------------------------------------

# WEB SERVER
# Web server is executed in a dedicated Java process. By default heap size is 512Mb.

# Use the following property to customize JVM options.
#    Recommendations:

#
#    The HotSpot Server VM is recommended. The property -server should be added if server mode

#    is not enabled by default on your environment:
#    http://docs.oracle.com/javase/8/docs/technotes/guides/vm/server-class.html

#
#sonar.web.javaOpts=-Xmx512m -Xms128m -XX:+HeapDumpOnOutOfMemoryError -Djava.net.preferIPv4Stack=true

# Same as previous property, but allows to not repeat all other settings like -Xmx

#sonar.web.javaAdditionalOpts=

# Binding IP address. For servers with more than one IP address, this property specifies which

# address will be used for listening on the specified ports.
# By default, ports will be used on all IP addresses associated with the server.

#sonar.web.host=0.0.0.0

# Web context. When set, it must start with forward slash (for example /sonarqube).

# The default value is root context (empty value).
#sonar.web.context=

# TCP port for incoming HTTP connections. Default value is 9000.
#sonar.web.port=9000

# The maximum number of connections that the server will accept and process at any given time.

# When this number has been reached, the server will not accept any more connections until
# the number of connections falls below this value. The operating system may still accept connections

# based on the sonar.web.connections.acceptCount property. The default value is 50.
#sonar.web.http.maxThreads=50

# The minimum number of threads always kept running. The default value is 5.

#sonar.web.http.minThreads=5

# The maximum queue length for incoming connection requests when all possible request processing

# threads are in use. Any requests received when the queue is full will be refused.
# The default value is 25.

#sonar.web.http.acceptCount=25

# TCP port for incoming AJP connections. Disabled if value is -1. Disabled by default.

#sonar.ajp.port=-1

#--------------------------------------------------------------------------------------------------

# COMPUTE ENGINE
# The Compute Engine is responsible for processing background tasks.

# Compute Engine is executed in a dedicated Java process. Default heap size is 512Mb.
# Use the following property to customize JVM options.

#    Recommendations:
#

#    The HotSpot Server VM is recommended. The property -server should be added if server mode
#    is not enabled by default on your environment:

#    http://docs.oracle.com/javase/8/docs/technotes/guides/vm/server-class.html
#

#sonar.ce.javaOpts=-Xmx512m -Xms128m -XX:+HeapDumpOnOutOfMemoryError -Djava.net.preferIPv4Stack=true

# Same as previous property, but allows to not repeat all other settings like -Xmx

#sonar.ce.javaAdditionalOpts=
# The number of workers in the Compute Engine. Value must be greater than zero.

# By default the Compute Engine uses a single worker and therefore processes tasks one at a time.
#    Recommendations:

#
#    Using N workers will require N times as much Heap memory (see property

#    sonar.ce.javaOpts to tune heap) and produce N times as much IOs on disk, database and
#    Elasticsearch. The number of workers must suit your environment.

#sonar.ce.workerCount=1

#--------------------------------------------------------------------------------------------------

# ELASTICSEARCH
# Elasticsearch is used to facilitate fast and accurate information retrieval.

# It is executed in a dedicated Java process. Default heap size is 1Gb.

# JVM options of Elasticsearch process

#    Recommendations:
#

#    Use HotSpot Server VM. The property -server should be added if server mode
#    is not enabled by default on your environment:

#    http://docs.oracle.com/javase/8/docs/technotes/guides/vm/server-class.html
#

#sonar.search.javaOpts=-Xmx1G -Xms256m -Xss256k -Djava.net.preferIPv4Stack=true \
#  -XX:+UseParNewGC -XX:+UseConcMarkSweepGC -XX:CMSInitiatingOccupancyFraction=75 \

#  -XX:+UseCMSInitiatingOccupancyOnly -XX:+HeapDumpOnOutOfMemoryError

# Same as previous property, but allows to not repeat all other settings like -Xmx

#sonar.search.javaAdditionalOpts=

# Elasticsearch port. Default is 9001. Use 0 to get a free port.

# As a security precaution, should be blocked by a firewall and not exposed to the Internet.
#sonar.search.port=9001

# Elasticsearch host. The search server will bind this address and the search client will connect to it.

# Default is 127.0.0.1.
# As a security precaution, should NOT be set to a publicly available address.

#sonar.search.host=127.0.0.1

#--------------------------------------------------------------------------------------------------

# UPDATE CENTER

# Update Center requires an internet connection to request http://update.sonarsource.org

# It is enabled by default.
#sonar.updatecenter.activate=true

# HTTP proxy (default none)

#http.proxyHost=
#http.proxyPort=

# HTTPS proxy (defaults are values of http.proxyHost and http.proxyPort)
#https.proxyHost=

#https.proxyPort=

# NT domain name if NTLM proxy is used

#http.auth.ntlm.domain=

# SOCKS proxy (default none)

#socksProxyHost=
#socksProxyPort=

# Proxy authentication (used for HTTP, HTTPS and SOCKS proxies)

#http.proxyUser=
#http.proxyPassword=

#--------------------------------------------------------------------------------------------------

# LOGGING

# Level of logs. Supported values are INFO(default), DEBUG and TRACE (DEBUG + SQL + ES requests)

#sonar.log.level=INFO

# Path to log files. Can be absolute or relative to installation directory.

# Default is `<installation home>`/logs
#sonar.path.logs=logs

# Rolling policy of log files

#    - based on time if value starts with "time:", for example by day ("time:yyyy-MM-dd")
#      or by month ("time:yyyy-MM")

#    - based on size if value starts with "size:", for example "size:10MB"
#    - disabled if value is "none".  That needs logs to be managed by an external system like logrotate.

#sonar.log.rollingPolicy=time:yyyy-MM-dd

# Maximum number of files to keep if a rolling policy is enabled.

#    - maximum value is 20 on size rolling policy
#    - unlimited on time rolling policy. Set to zero to disable old file purging.

#sonar.log.maxFiles=7

# Access log is the list of all the HTTP requests received by server. If enabled, it is stored

# in the file {sonar.path.logs}/access.log. This file follows the same rolling policy as for
# sonar.log (see sonar.log.rollingPolicy and sonar.log.maxFiles).

#sonar.web.accessLogs.enable=true

# Format of access log. It is ignored if sonar.web.accessLogs.enable=false. Possible values are:

#    - "common" is the Common Log Format, shortcut to: %h %l %u %user %date "%r" %s %b
#    - "combined" is another format widely recognized, shortcut to: %h %l %u [%t] "%r" %s %b "%i{Referer}" "%i{User-Agent}"

#    - else a custom pattern. See http://logback.qos.ch/manual/layouts.html#AccessPatternLayout.
# If SonarQube is behind a reverse proxy, then the following value allows to display the correct remote IP address:

#sonar.web.accessLogs.pattern=%i{X-Forwarded-For} %l %u [%t] "%r" %s %b "%i{Referer}" "%i{User-Agent}"
# Default value is:

#sonar.web.accessLogs.pattern=combined

#--------------------------------------------------------------------------------------------------

# OTHERS

# Delay in seconds between processing of notification queue. Default is 60 seconds.

#sonar.notifications.delay=60

# Paths to persistent data files (embedded database and search index) and temporary files.

# Can be absolute or relative to installation directory.
# Defaults are respectively `<installation home>`/data and `<installation home>`/temp

#sonar.path.data=data
#sonar.path.temp=temp

#--------------------------------------------------------------------------------------------------

# DEVELOPMENT - only for developers
# The following properties MUST NOT be used in production environments.

# Dev mode allows to reload web sources on changes and to restart server when new versions

# of plugins are deployed.
#sonar.web.dev=false

# Path to webapp sources for hot-reloading of Ruby on Rails, JS and CSS (only core,

# plugins not supported).
#sonar.web.dev.sources=/path/to/server/sonar-web/src/main/webapp

# Elasticsearch HTTP connector, for example for KOPF:

# http://lmenezes.com/elasticsearch-kopf/?location=http://localhost:9010
#sonar.search.httpPort=-1

sonar.jdbc.username=sonar
sonar.jdbc.password=PASSWD

sonar.jdbc.url=jdbc:mysql://localhost:3306/sonar?useUnicode=true&characterEncoding=utf8&rewriteBatchedStatements=true&useConfigs=maxPerformance

#sonar.web.host=IP

#sonar.web.context=/sonar
#sonar.web.port=9000

#sonar.web.javaAdditionalOpts=-agentlib:jdwp=transport=dt_socket,server=y,suspend=y,address=8000- chmod 644 /usr/local/sonar/conf/sonar.properties
- touch /usr/local/sonar-scanner/conf/sonar-scanner.properties с содержимым:
/usr/local/sonar-scanner/conf/sonar-scanner.properties
#Configure here general information about the environment, such as SonarQube DB details for example

#No information about specific project should appear here

#----- Default SonarQube server

#sonar.host.url=http://localhost:9000

#----- Default source code encoding

#sonar.sourceEncoding=UTF-8

#----- Global database settings (not used for SonarQube 5.2+)

#sonar.jdbc.username=sonar
#sonar.jdbc.password=sonar

#----- PostgreSQL

#sonar.jdbc.url=jdbc:postgresql://localhost/sonar

#----- MySQL

#sonar.jdbc.url=jdbc:mysql://localhost:3306/sonar?useUnicode=true&characterEncoding=utf8

#----- Oracle

#sonar.jdbc.url=jdbc:oracle:thin:@localhost/XE

#----- Microsoft SQLServer

#sonar.jdbc.url=jdbc:jtds:sqlserver://localhost/sonar;SelectMethod=Cursor

sonar.jdbc.username=sonar
sonar.jdbc.password=PASSSWD

sonar.jdbc.url=jdbc:mysql://localhost:3306/sonar?useUnicode=true&characterEncoding=utf8&rewriteBatchedStatements=true&useConfigs=maxPerformance
- chmod 644 /usr/local/sonar-scanner/conf/sonar-scanner.properties
- chkconfig --add sonar
- /sbin/chkconfig sonar on
- cat "PASSWD" > /usr/local/sonar/conf/.pass
- chmod 400 /usr/local/sonar/conf/.pass
- yum install -y auto-buildrequires yumbootstrap bayzr
- cp /usr/share/bzr.java/bayzr-plugin-0.0.1-rel1.jar /usr/local/sonar/extensions/plugins/
- service sonar start
- mysql -e "CREATE DATABASE bayzr CHARACTER SET utf8 COLLATE utf8_general_ci;"
- mysql -e "CREATE USER 'bayzr' IDENTIFIED BY 'PASSWD';"
- mysql -e "GRANT ALL ON bayzr.* TO 'bayzr'@'%' IDENTIFIED BY 'PASSWD';"
- mysql -e "GRANT ALL ON bayzr.* TO 'bayzr'@'localhost' IDENTIFIED BY 'PASSWD';"
- mysql -e "FLUSH PRIVILEGES;"
- curl --data "login=admin&password=admin" -H "Content-Type: application/x-www-form-urlencoded" -X POST http://127.0.0.1:9000
- curl --user admin:admin --data "key=genericcoverage" -H "Content-Type: application/x-www-form-urlencoded" -X POST http://127.0.0.1:9000/api/plugins/install
- curl --user admin:admin --data "key=l10nru" -H "Content-Type: application/x-www-form-urlencoded" -X POST http://127.0.0.1:9000/api/plugins/install
- curl --user admin:admin --data "key=widgetlab" -H "Content-Type: application/x-www-form-urlencoded" -X POST http://127.0.0.1:9000/api/plugins/install
- curl --user admin:admin --data "key=scmgit" -H "Content-Type: application/x-www-form-urlencoded" -X POST http://127.0.0.1:9000/api/plugins/install
- curl --user admin:admin --data "key=csharp" -H "Content-Type: application/x-www-form-urlencoded" -X POST http://127.0.0.1:9000/api/plugins/install
- curl --user admin:admin --data "key=java" -H "Content-Type: application/x-www-form-urlencoded" -X POST http://127.0.0.1:9000/api/plugins/install
- curl --user admin:admin --data "key=javascript" -H "Content-Type: application/x-www-form-urlencoded" -X POST http://127.0.0.1:9000/api/plugins/install
- yum -y install pylint
- service sonar stop
- service sonar start
- curl --user admin:admin --data "id=sonar.bayzr.pass&value=PASSWD" -H "Content-Type: application/x-www-form-urlencoded" -X POST http://127.0.0.1:9000/api/plugins/install
- yum install -y squid
- systemctl enable squid
- touch /etc/squid/squid.conf с содержимым:
/etc/squid/squid.conf
#

# Recommended minimum configuration:
#

# Example rule allowing access from your local networks.

# Adapt to list your (internal) IP networks from where browsing
# should be allowed

acl localnet src 10.0.0.0/8 # RFC1918 possible internal network
acl localnet src 172.16.0.0/12  # RFC1918 possible internal network
acl localnet src 192.168.0.0/16 # RFC1918 possible internal network
acl localnet src fc00::/7       # RFC 4193 local private network range
acl localnet src fe80::/10      # RFC 4291 link-local (directly plugged) machines

acl SSL_ports port 443
acl Safe_ports port 80      # http
acl Safe_ports port 21      # ftp
acl Safe_ports port 443     # https
acl Safe_ports port 70      # gopher
acl Safe_ports port 210     # wais
acl Safe_ports port 1025-65535  # unregistered ports
acl Safe_ports port 280     # http-mgmt
acl Safe_ports port 488     # gss-http
acl Safe_ports port 591     # filemaker
acl Safe_ports port 777     # multiling http
acl CONNECT method CONNECT

#

# Recommended minimum Access Permission configuration:
#

# Deny requests to certain unsafe ports
http_access deny !Safe_ports

# Deny CONNECT to other than secure SSL ports

http_access deny CONNECT !SSL_ports

# Only allow cachemgr access from localhost

http_access allow localhost manager
http_access deny manager

# We strongly recommend the following be uncommented to protect innocent

# web applications running on the proxy server who think the only
# one who can access services on "localhost" is a local user

#http_access deny to_localhost

#

# INSERT YOUR OWN RULE(S) HERE TO ALLOW ACCESS FROM YOUR CLIENTS
#

# Example rule allowing access from your local networks.

# Adapt localnet in the ACL section to list your (internal) IP networks
# from where browsing should be allowed

http_access allow localnet
http_access allow localhost

# And finally deny all other access to this proxy

http_access deny all

# Squid normally listens to port 3128

http_port 3128

# Uncomment and adjust the following to add a disk cache directory.

cache_dir ufs /var/spool/squid 2048 16 256

# Leave coredumps in the first cache dir

coredump_dir /var/spool/squid

#

# Add any of your own refresh_pattern entries above these.
#

refresh_pattern ^ftp:       1440    20% 10080
refresh_pattern ^gopher:    1440    0%  1440
refresh_pattern -i (/cgi-bin/|\?) 0 0%  0
refresh_pattern .       0   20% 4320

maximum_object_size 300000000- chmod 640 /etc/squid/squid.conf
- systemctl start squid
- touch /etc/yumbootstrap/suites/centos-7-mod.suite с содержимым:
/etc/yumbootstrap/suites/centos-7-mod.suite
name = CentOS
release = 7

gpg_key =  gpg/RPM-GPG-KEY-CentOS-7
gpg_key ?= gpg/RPM-GPG-KEY-CentOS-Security-7
gpg_key ?= gpg/repomd.xml.key

packages = packages/${suite}.list

[main]
cachedir=/yumbootstrap/cache
logfile=/yumbootstrap/log/yum.log
keepcache=0
debuglevel=2
exactarch=1
obsoletes=1
installonly_limit=5
proxy=http://127.0.0.1:3128

[post_install]
finalize = scripts/addbayzr.py
finalize = scripts/fix_rpmdb.py
finalize = scripts/clean_yumbootstrap.py

[repositories]
centos         = http://mirror.centos.org/centos/7/os/$basearch/
centos-updates = http://mirror.centos.org/centos/7/updates/$basearch/
home_repo      = http://download.opensuse.org/repositories/home:/bayrepo/CentOS_7/
centos-extras  = http://mirror.centos.org/centos/7/extras/$basearch/

[environment]
HOME=/root
TERM="$TERM"
PS1='\u:\w\$ '
PATH=/bin:/usr/bin:/sbin:/usr/sbin
OUT_USER=checker

[cache]
cache_dir = /usr/share/yumbotstrapcache
cache_expire = 2592000

# vim:ft=dosini
- chmod 644 /etc/yumbootstrap/suites/centos-7-mod.suite
- touch /etc/yumbootstrap/suites/packages/centos-7-mod.list с содержимым:
/etc/yumbootstrap/suites/packages/centos-7-mod.list
# subset from @Core

coreutils
bash
grep
gawk
basesystem
rpm
initscripts
iproute
sudo
shadow-utils

# subset from @Base

less
make
mktemp
vim-minimal
yum
which
#authconfig

#dhclient
chkconfig
# graphical boot helper (used by initscripts)

plymouth
# ~root/.*

rootfiles

#utils

bayzr
pylint
java-1.8.0-openjdk
~/usr/local/sonar-scanner
~/etc/resolv.conf
~/usr/bin/shellcheck
gcc
gcc-c++
make
cmake
git
bay-gcc61
clang
clang-analyzer
cppcheck
oclint
rats
splint
pylint
rpmlint
frama-c
+/var/lib/mysql
+/usr/local/sonar
+/dev
+/proc

# redhat-release

centos-release

# required to fix RPM DB

/usr/bin/db_load
- chmod 644 /etc/yumbootstrap/suites/packages/centos-7-mod.list
- touch /etc/yumbootstrap/suites/gpg/repomd.xml.key с содержимым:
/etc/yumbootstrap/suites/gpg/repomd.xml.key
-----BEGIN PGP PUBLIC KEY BLOCK-----
Version: GnuPG v2.0.15 (GNU/Linux)

mQENBFcngrQBCACohw+37Sk3pxTVWwM+vz6zMImQjOXO6nPA+X2/I996oR2/RDil
l3iGzsBw37p2/BZb6CO+4w157KfSzhGTEexcjl5rJ9ZPs96Zsizweh4KdBjZRqyE
7qb81ZXudItVXDb7Da7z164EwiLkEdUIFGoQuWMZlJ2/UANg652SOxUaNIIVOWSx
rT/o7NaaUx2H9KtAikaHth+29wWmoQkgD0Tr5YBvtufQw+gy7lBdQlcy5HNx6weW
WwE+YhUYgc9AOyhPA3HLP6m5YsvK0O9g2d893N7JLypEjtjm3EPhw94cstfAiHLC
OJU8/9MDXAeTX2NZtoTqlb/vbqADHO/5UpRPABEBAAG0OmhvbWU6YmF5cmVwbyBP
QlMgUHJvamVjdCA8aG9tZTpiYXlyZXBvQGJ1aWxkLm9wZW5zdXNlLm9yZz6JAT4E
EwECACgFAlcngrQCGwMFCQQesAAGCwkIBwMCBhUIAgkKCwQWAgMBAh4BAheAAAoJ
EAOb5ANUCoMaezUH/1UAcLos3tAdYkAzOmFDIrGr8a01ss9mT6uR9orGcawJds67
ZsRFqzGu2P+bTvzflDyk6QFYQyYjSbXoYPPXXEVidskEL1iuF4kXk6yxvo83xfCk
DOTIt8O88pRkWOm8Rv5pTMqvtp9TMR/Vkyl9ABvTugLiH1sdHhNpEGdR90Bu7sLl
djJvlZePp/KamOGnKlj/UjMMYQro78kji+JpNnD0r85WcuBgfdITm6p0GmWmPvgk
MzayyRZ7uqHXRSpxNN1TMuoS4Nk4pNjiBpw5WvxpVroi/SMIL22t69UqdH/ZUPFc
/eND1LeQZl0KxIyeNPpKnkS+Am790FY9uGiA5SyIRgQTEQIABgUCVyeCtAAKCRA7
MBG3a51lI89EAJ9gMmRlng9I8bXyRDOe/pkMTCs+cACeMLfrf2STae8ktJvxqoHY
SaaQsrM=
###### H2m6

-----END PGP PUBLIC KEY BLOCK-----
- chmod 644 /etc/yumbootstrap/suites/gpg/repomd.xml.key
- touch /etc/yumbootstrap/suites/scripts/addbayzr.py с содержимым:
/etc/yumbootstrap/suites/scripts/addbayzr.py
#!/usr/bin/python

import os
import time
import logging
import pwd
import grp
import yumbootstrap.yum
import yumbootstrap.log
from shutil import copyfile

def createUser(username,uid,gid):
    os.system("/usr/sbin/groupadd " + username + " -g " + str(gid))
    return  os.system("/usr/sbin/useradd -s " + "/bin/bash "+ "-d "+ "/home/" + username + " -m " + username + " -u " + str(uid) + " -g " + str(gid))

#-----------------------------------------------------------------------------

logger = logging.getLogger()
logger.addHandler(yumbootstrap.log.ProgressHandler())
if os.environ['VERBOSE'] == 'true':
    logger.setLevel(logging.INFO)
#-----------------------------------------------------------------------------

out_user = os.environ['OUT_USER']
uid = pwd.getpwnam(out_user).pw_uid
gid = grp.getgrnam(out_user).gr_gid

if uid != os.getuid():
    print "Prepare chroot for non root user"
    os.chown(os.environ['TARGET'], uid, gid)
    real_root = os.open("/", os.O_RDONLY)
    os.chroot(os.environ['TARGET'])
    createUser(out_user, uid, gid)
    with open("/etc/sudoers", "a") as myfile:
        myfile.write("%s ALL = NOPASSWD : /usr/bin/yum, /usr/bin/rpm, /home/checker/pre_execute\n" % out_user)
    os.fchdir(real_root)
    os.chroot(".")
    os.mkdir( os.environ['TARGET'] + "/home/" + out_user + "/.ssh/", 0700 );
    copyfile("/root/config", os.environ['TARGET'] + "/home/" + out_user + "/.ssh/config")
    os.chown(os.environ['TARGET'] + "/home/" + out_user + "/.ssh/", uid, gid)
    os.chown(os.environ['TARGET'] + "/home/" + out_user + "/.ssh/config", uid, gid)
    # Back to old root
    os.close(real_root)
- chmod 755 /etc/yumbootstrap/suites/scripts/addbayzr.py
- yum install -y yum-utils
- rpm -ihv https://dl.fedoraproject.org/pub/epel/epel-release-latest-7.noarch.rpm
- /usr/bin/yum-config-manager --enablerepo=epel-testing
- yum install -y patch cabal-install cabal-dev cabal-rpm ghc-Cabal ghc-Cabal-devel ghc-rpm-macros ghc-containers-devel ghc-directory-devel ghc-json-devel ghc-mtl-devel ghc-parsec-devel ghc-regex-compat-devel ghc-QuickCheck-devel cpphs hscolour chrpath pandoc
- cabal update
- wget https://github.com/koalaman/shellcheck/archive/v0.4.4.zip
- unzip v0.4.4.zip
- cd shellcheck-0.4.4"
- cabal update
- cabal install --force-reinstalls
- mv /root/.cabal/bin/shellcheck /usr/bin/
- rpm -e epel-release
- systemctl enable citool
- touch /etc/sudoers с содержимым:
/etc/sudoers
## Sudoers allows particular users to run various commands as

## the root user, without needing the root password.
##

## Examples are provided at the bottom of the file for collections
## of related commands, which can then be delegated out to particular

## users or groups.
##

## This file must be edited with the 'visudo' command.

## Host Aliases

## Groups of machines. You may prefer to use hostnames (perhaps using
## wildcards for entire domains) or IP addresses instead.

# Host_Alias     FILESERVERS = fs1, fs2
# Host_Alias     MAILSERVERS = smtp, smtp2

## User Aliases

## These aren't often necessary, as you can use regular groups
## (ie, from files, LDAP, NIS, etc) in this file - just use %groupname

## rather than USERALIAS
# User_Alias ADMINS = jsmith, mikem

## Command Aliases

## These are groups of related commands...

## Networking

# Cmnd_Alias NETWORKING = /sbin/route, /sbin/ifconfig, /bin/ping, /sbin/dhclient, /usr/bin/net, /sbin/iptables, /usr/bin/rfcomm, /usr/bin/wvdial, /sbin/iwconfig, /sbin/mii-tool

## Installation and management of software

# Cmnd_Alias SOFTWARE = /bin/rpm, /usr/bin/up2date, /usr/bin/yum

## Services

# Cmnd_Alias SERVICES = /sbin/service, /sbin/chkconfig, /usr/bin/systemctl start, /usr/bin/systemctl stop, /usr/bin/systemctl reload, /usr/bin/systemctl restart, /usr/bin/systemctl status, /usr/bin/systemctl enable, /usr/bin/systemctl disable

## Updating the locate database

# Cmnd_Alias LOCATE = /usr/bin/updatedb

## Storage

# Cmnd_Alias STORAGE = /sbin/fdisk, /sbin/sfdisk, /sbin/parted, /sbin/partprobe, /bin/mount, /bin/umount

## Delegating permissions

# Cmnd_Alias DELEGATING = /usr/sbin/visudo, /bin/chown, /bin/chmod, /bin/chgrp

## Processes

# Cmnd_Alias PROCESSES = /bin/nice, /bin/kill, /usr/bin/kill, /usr/bin/killall

## Drivers

# Cmnd_Alias DRIVERS = /sbin/modprobe

# Defaults specification

#

# Disable "ssh hostname sudo `<cmd>`", because it will show the password in clear.
#         You have to run "ssh -t hostname sudo `<cmd>`".

#
Defaults    requiretty

#

# Refuse to run if unable to disable echo on the tty. This setting should also be
# changed in order to be able to use sudo without a tty. See requiretty above.

#
Defaults   !visiblepw

#

# Preserving HOME has security implications since many programs
# use it when searching for configuration files. Note that HOME

# is already set when the the env_reset option is enabled, so
# this option is only effective for configurations where either

# env_reset is disabled or HOME is present in the env_keep list.
#

Defaults    always_set_home

Defaults    env_reset
Defaults    env_keep =  "COLORS DISPLAY HOSTNAME HISTSIZE INPUTRC KDEDIR LS_COLORS"
Defaults    env_keep += "MAIL PS1 PS2 QTDIR USERNAME LANG LC_ADDRESS LC_CTYPE"
Defaults    env_keep += "LC_COLLATE LC_IDENTIFICATION LC_MEASUREMENT LC_MESSAGES"
Defaults    env_keep += "LC_MONETARY LC_NAME LC_NUMERIC LC_PAPER LC_TELEPHONE"
Defaults    env_keep += "LC_TIME LC_ALL LANGUAGE LINGUAS _XKB_CHARSET XAUTHORITY"

#

# Adding HOME to env_keep may enable a user to run unrestricted
# commands via sudo.

#
# Defaults   env_keep += "HOME"

Defaults    secure_path = /sbin:/bin:/usr/sbin:/usr/bin

## Next comes the main part: which users can run what software on

## which machines (the sudoers file can be shared between multiple
## systems).

## Syntax:
##

##  user    MACHINE=COMMANDS
##

## The COMMANDS section may have other options added to it.
##

## Allow root to run any commands anywhere
root    ALL=(ALL)   ALL

## Allows members of the 'sys' group to run networking, software,

## service management apps and more.
# %sys ALL = NETWORKING, SOFTWARE, SERVICES, STORAGE, DELEGATING, PROCESSES, LOCATE, DRIVERS

## Allows people in group wheel to run all commands

%wheel  ALL=(ALL)   ALL

## Same thing without a password

# %wheel    ALL=(ALL)   NOPASSWD: ALL

## Allows members of the users group to mount and unmount the

## cdrom as root
# %users  ALL=/sbin/mount /mnt/cdrom, /sbin/umount /mnt/cdrom

## Allows members of the users group to shutdown this system

# %users  localhost=/sbin/shutdown -h now

## Read drop-in files from /etc/sudoers.d (the # here does not mean a comment)

#includedir /etc/sudoers.d

checker ALL = NOPASSWD : /usr/sbin/yumbootstrap, /home/checker/pre_execute, /usr/bin/yum
- chmod 440 /etc/sudoers
- setcap cap_sys_chroot+ep /usr/sbin/chroot
- setcap cap_sys_chroot+ep /usr/sbin/citool
- touch /etc/citool.ini с содержимым:
/etc/citool.ini
[mysql]
connect=bayzr:PASSSWD@tcp(127.0.0.1:3306)/bayzr?charset=utf8
clean=10
timetoclean=59 59 23 * * *

[server]
workers=10
wait=30- chmod 644 /etc/citool.ini
- systemctl start citool
- /usr/bin/chown checker:checker /etc/citool.ini
- touch /root/config с содержимым:
/root/config
Host *
    StrictHostKeyChecking no
- chmod 400 /root/config
Добавить комментарий

AlexBR
Обо мне
bayrepo.info@gmail.com, все!
Репозиторий с полезными пакетами(по моему мнению):
ссылки пока нет. Старый удален. Работаю над этим
есть самописные программы и библиотеки описанные в блоге и документации, а так же последние версии используемых мною программ.
Отладчики, дизассемблеры, статические анализаторы
Блог удач и неудач. Здесь я выкладываю статьи о начинаниях которые получились и которые не получались.
youtube канал